Carbon's Blog

以梦为马 不负韶华


  • 首页

  • 标签

  • 分类

  • 归档

  • 搜索

[LeetCode] Minimum Time Difference

发表于 2018-06-12 | 更新于: 2018-07-02 | 分类于 Algorithm

题目描述

Given a list of 24-hour clock time points in “Hour:Minutes” format, find the minimum minutes difference between any two time points in the list.
Example 1:

Input: [“23:59”,”00:00”]
Output: 1

Note:
The number of time points in the given list is at least 2 and won’t exceed 20000.
The input time is legal and ranges from 00:00 to 23:59.
输入是一个时间的数组,要求求出最小的时间间隔。思路是对时间排序,然后求每相邻两个时间间隔的时间差与第一个时间与最后一个时间的时间差。比较得到最小的时间间隔。

C++ 实现

1
2
3
4
5
6
7
8
9
10
11
12
13
14
15
16
17
18
19
20
21
22
23
24
25
26
27
28
29
30
31
32
33
34
35
36
37
38
39
40
41
42
43
44
45
46
47
48
49
50
51
52
53
54
55
56
57
58
59
60
61
class Solution {
public:
int findMinDifference(vector<string>& timePoints) {
struct Time
{
uint8_t hour;
uint8_t min;
Time(const uint8_t hour, const uint8_t min)
: hour(hour), min(min)
{
}

bool operator<(const Time& other) const
{
if (hour < other.hour)
{
return true;
}
else if (hour == other.hour)
{
return min < other.min;
}
return false;
}

int operator-(const Time& other) const
{
int hour_diff = hour - other.hour;
int min_diff = min - other.min;

return hour_diff * 60 + min_diff;
}
};

vector<Time> times;
times.reserve(timePoints.size());
for (const string& time_point : timePoints)
{
const size_t idx = time_point.find(":");
const uint8_t hour = stoi(time_point.substr(0,idx));
const uint8_t min = stoi(time_point.substr(idx + 1,time_point.size() - idx));
times.emplace_back(Time{hour,min});
}

sort(times.begin(), times.end());

int res = INT_MAX;
for (int i = 0; i < times.size() - 1; i++)
{
const Time& t1 = times[i];
const Time& t2 = times[i + 1];
res = min(t2 - t1, res);
}

const Time first_t(times.front().hour + 24, times.front().min);
const Time& last_t = times.back();
res = min(first_t - last_t, res);

return res;
}
};

C++利用宏实现统计运行时间工具

发表于 2018-06-05 | 更新于: 2018-09-04 | 分类于 Backend Development

背景

OSRM backend 代码中有一个timing_util.hpp的头文件,其利用宏以及c++11 chrono 实现了统计代码运行时间的工具。
在工程中统计代码运行时间非常常用,本文介绍OSRM timing_util的实现原理,并用示例来说明。

实现解析

timing_util.hpp

1
2
3
4
5
6
7
8
9
10
11
12
13
14
15
16
17
18
19
20
21
22
23
24
25
26
27
28
29
30
31
32
33
34
35
#ifndef TIMING_UTIL_HPP
#define TIMING_UTIL_HPP

#include <chrono>
#include <cstdint>

namespace osrm
{
namespace util
{
// 用TIMER_START 定义一个变量记录开始的时间
#define TIMER_START(_X) auto _X##_start = std::chrono::steady_clock::now(), _X##_stop = _X##_start
// 用TIMER_STOP 定义一个变量记录结束的时间
#define TIMER_STOP(_X) _X##_stop = std::chrono::steady_clock::now()
// TIMER_NSEC 定义start到stop经历了多少纳秒
#define TIMER_NSEC(_X) \
std::chrono::duration_cast<std::chrono::nanoseconds>(_X##_stop - _X##_start).count()
// TIMER_USEC 定义start到stop历经多少微秒
#define TIMER_USEC(_X) \
std::chrono::duration_cast<std::chrono::microseconds>(_X##_stop - _X##_start).count()
// TIMER_MSEC 定义start到stop经历多少毫秒
#define TIMER_MSEC(_X) \
(0.000001 * \
std::chrono::duration_cast<std::chrono::nanoseconds>(_X##_stop - _X##_start).count())
// TIMER_SEC 定义start到stop经历多少秒
#define TIMER_SEC(_X) \
(0.000001 * \
std::chrono::duration_cast<std::chrono::microseconds>(_X##_stop - _X##_start).count())
// TIMER_MIN 定义start到stop经历多少分钟
#define TIMER_MIN(_X) \
std::chrono::duration_cast<std::chrono::minutes>(_X##_stop - _X##_start).count()
}
}

#endif // TIMING_UTIL_HPP

timing_util在定义宏变量时使用 ##,##的作用是把宏参数和相邻的字符进行字符串连接,# 的作用是把宏参数当做一个字符串。以下是关于宏中# 以及## 用法的示例。

1
2
3
4
5
6
7
8
9
10
11
12
13
14
15
16
17
18
19
/*************************************************************************
> File Name: test_macro.cpp
> Author: ce39906
> Mail: ce39906@163.com
> Created Time: 2018-06-05 17:38:01
************************************************************************/
#include <iostream>

#define STR(s) #s
#define CONS(a, b) int(a##e##b)

int main()
{
// 输出字符串abc
std::cout << STR(abc) << std::endl;
// 输出2000 (2e3 == 2000)
std::cout << CONS(2, 3) << std::endl;
return 0;
}

TIMING_UTIL统计运行时间示例

timing_util.cpp

1
2
3
4
5
6
7
8
9
10
11
12
13
14
15
16
17
18
19
20
21
22
23
24
25
26
27
28
29
/*************************************************************************
> File Name: timing_util.cpp
> Author: ce39906
> Mail: ce39906@163.com
> Created Time: 2018-06-05 17:46:50
************************************************************************/
#include "timing_util.hpp"
#include <iostream>

using namespace osrm::util;

int main()
{
TIMER_START(x);
for (int i = 0; i < 10000; i++)
{
for (int j = 0; j < 10000; j++)
{
int ij = i * j;
}
}
TIMER_STOP(x);
std::cout << "Two Level Loop Cost " << TIMER_NSEC(x) << " ns.\n";
std::cout << "Two Level Loop Cost " << TIMER_USEC(x) << " us.\n";
std::cout << "Two Level Loop Cost " << TIMER_MSEC(x) << " ms.\n";
std::cout << "Two Level Loop Cost " << TIMER_SEC(x) << " s.\n";
std::cout << "Two Level Loop Cost " << TIMER_MIN(x) << " min.\n";
return 0;
}

编译

1
g++ timing_util.cpp -o timing_util --std=c++11

运行

1
./timing_util

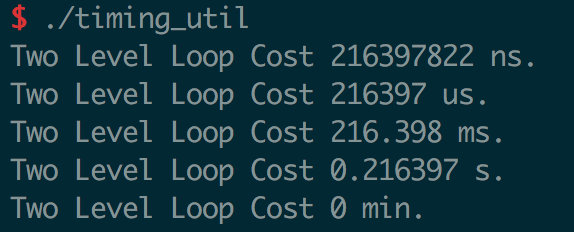
运行结果如下
avatar

Linux cmake 静态链接boost

发表于 2018-06-05 | 更新于: 2018-09-04 | 分类于 Backend Development

背景

使用动态链接编译的二进制程序在执行时要求开发环境与生产环境严格一致,因此我们更倾向于使用静态链接的方式链接第三方库。本文介绍如何在Linux 环境下使用cmake 静态链接Boost 库。

示例

我们将编译好boost静态库.a 文件和头文件放入third_party 目录,在CMakeLists.txt 中使用find_package 方法查找boost静态库。
我自己在CentOS 6.6 编译的boost 1.63.0 静态库以及头文件 boost static library

1
2
3
4
5
6
7
8
9
10
// 加入boost头文件路径
INCLUDE_DIRECTORIES(${CMAKE_CURRENT_SOURCE_DIR}/third_party/boost_1_63_0/include)
// 设置boost使用静态链接
set(Boost_USE_STATIC_LIBS ON)
// 设置需要的boost 组件
set(BOOST_COMPONENTS date_time chrono filesystem iostreams program_options regex system thread unit_test_framework)
// 使用cmake find_package 查找boost库位置
find_package(Boost REQUIRED COMPONENTS ${BOOST_COMPONENTS})
// 编译的bin 文件链接boost 库
TARGET_LINK_LIBRARIES(your_bin_name ${Boost_LIBRARIES})

需要注意的是,仅在CMakeLists.txt 中这样设置的话cmake find_package 无法找到boost 静态库的位置。在cmake 前加入如下参数

1
2
3
# 需要指定boost静态库的绝对路径
cmake -DBOOST_INCLUDEDIR=$(workspace)/third_party/boost_1_63_0/include \
-DBOOST_LIBRARYDIR=$(workspace)/third_party/boost_1_63_0/lib ..

编译helloboost 程序静态链接boost库的完整示例如下。
helloboost.cpp

1
2
3
4
5
6
7
8
9
10
11
12
13
14
15
16
17
18
19
20
21
22
/*************************************************************************
> File Name: helloboost.cpp
> Author: ce39906
> Mail: ce39906@163.com
> Created Time: 2018-06-05 16:02:08
************************************************************************/
#include <iostream>
#include <string>
#include <vector>
// test boost split
#include <boost/algorithm/string.hpp>
// include other boost header file you need.

int main()
{
std::string s("1;2;3;4");
std::vector<std::string> v;
std::cout << "Before boost split, size of v is " << v.size() << std::endl;
boost::split(v, s, boost::is_any_of(";"));
std::cout << "After boost split, size of v is " << v.size() << std::endl;
return 0;
}

CmakeLists.txt

1
2
3
4
5
6
7
8
9
10
11
12
13
14
15
16
cmake_minimum_required(VERSION 2.6)

project(helloboost C CXX)

SET(CMAKE_CXX_FLAGS "-g -w -O2")

#default binary and lib path
SET(EXECUTABLE_OUTPUT_PATH ${CMAKE_SOURCE_DIR})
#begin to set boost static library
INCLUDE_DIRECTORIES(${CMAKE_CURRENT_SOURCE_DIR}/third_party/boost_1_63_0/include)
set(Boost_USE_STATIC_LIBS ON)
set(BOOST_COMPONENTS date_time chrono filesystem iostreams program_options regex system thread unit_test_framework)
find_package(Boost REQUIRED COMPONENTS ${BOOST_COMPONENTS})

ADD_EXECUTABLE(helloboost helloboost.cpp)
TARGET_LINK_LIBRARIES(helloboost ${Boost_LIBRARIES})

install.sh

1
2
3
4
5
6
7
8
#!/bin/bash
workspace=$(pwd)
mkdir -p build
cd build

cmake -DBOOST_INCLUDEDIR=${workspace}/third_party/boost_1_63_0/include \
-DBOOST_LIBRARYDIR=${workspace}/third_party/boost_1_63_0/lib ..
make

编译并执行

1
2
./install.sh
./helloboost

执行结果如下
avatar

[LeetCode] Linked List Components

发表于 2018-05-31 | 更新于: 2018-07-02 | 分类于 Algorithm

题目描述

We are given head, the head node of a linked list containing unique integer values.

We are also given the list G, a subset of the values in the linked list.

Return the number of connected components in G, where two values are connected if they appear consecutively in the linked list.

Example 1:

Input:
head: 0->1->2->3
G = [0, 1, 3]
Output: 2
Explanation:
0 and 1 are connected, so [0, 1] and [3] are the two connected components.

Example 2:

Input:
head: 0->1->2->3->4
G = [0, 3, 1, 4]
Output: 2
Explanation:
0 and 1 are connected, 3 and 4 are connected, so [0, 1] and [3, 4] are the two connected components.

Note:

If N is the length of the linked list given by head, 1 <= N <= 10000.
The value of each node in the linked list will be in the range [0, N - 1].
1 <= G.length <= 10000.
G is a subset of all values in the linked list.

输入包括一个单链表以及一个数组,单链表中的节点不重复。数组存储图的所有节点,要求求出单链表中有多少个连通分量。
此题可以使用hash table存储图的所有节点,顺序遍历单链表,如果单链表连续几个节点都是图中的节点,则继续向前遍历查找。在找到第一不是图节点的时候,统计连通图数的变量加一。

C++ 实现

1
2
3
4
5
6
7
8
9
10
11
12
13
14
15
16
17
18
19
20
21
22
23
24
25
26
27
28
29
30
31
32
33
34
35
/**
* Definition for singly-linked list.
* struct ListNode {
* int val;
* ListNode *next;
* ListNode(int x) : val(x), next(NULL) {}
* };
*/
class Solution {
public:
int numComponents(ListNode* head, vector<int>& G) {
unordered_set<int> g(G.begin(), G.end());
int res = 0;
while(head)
{
int component_size = 0;
while (head && g.count(head->val))
{
component_size++;
head = head->next;
}

if (component_size > 0)
{
res++;
}

if (head)
{
head = head->next;
}
}
return res;
}
};

[LeetCode] Max Increase to Keep City Skyline

发表于 2018-05-30 | 更新于: 2018-07-02 | 分类于 Algorithm

题目描述

In a 2 dimensional array grid, each value grid[i][j] represents the height of a building located there. We are allowed to increase the height of any number of buildings, by any amount (the amounts can be different for different buildings). Height 0 is considered to be a building as well.

At the end, the “skyline” when viewed from all four directions of the grid, i.e. top, bottom, left, and right, must be the same as the skyline of the original grid. A city’s skyline is the outer contour of the rectangles formed by all the buildings when viewed from a distance. See the following example.

What is the maximum total sum that the height of the buildings can be increased?

Example:

Input: grid = [[3,0,8,4],[2,4,5,7],[9,2,6,3],[0,3,1,0]]
Output: 35
Explanation:
The grid is:
[ [3, 0, 8, 4],
[2, 4, 5, 7],
[9, 2, 6, 3],
[0, 3, 1, 0] ]
The skyline viewed from top or bottom is: [9, 4, 8, 7]
The skyline viewed from left or right is: [8, 7, 9, 3]
The grid after increasing the height of buildings without affecting skylines is:
gridNew = [ [8, 4, 8, 7],
[7, 4, 7, 7],
[9, 4, 8, 7],
[3, 3, 3, 3] ]

Notes:

1 < grid.length = grid[0].length <= 50.
All heights grid[i][j] are in the range [0, 100].
All buildings in grid[i][j] occupy the entire grid cell: that is, they are a 1 x 1 x grid[i][j] rectangular prism.
二维数组存储楼房的高度,从左到右或从上到下都有最大值。要求对于每个节点尽可能升高高度,要求升高之后之前从左到右以及从上到下的最大值依然最大。要求返回最高的升高高度。
思路是遍历二维数组,求出从左到右以及从上到下的最高楼房高度,然后在遍历一遍二维数组中的所有值,当前可以到达的最高高度是当前位置从左到右和从上到下的较小值,不断累加得到最后结果。

C++ 实现

1
2
3
4
5
6
7
8
9
10
11
12
13
14
15
16
17
18
19
20
21
22
23
24
25
26
27
28
29
30
31
32
class Solution {
public:
int maxIncreaseKeepingSkyline(vector<vector<int>>& grid) {
int row_size = grid.size();
if (row_size == 0) return 0;
int col_size = grid[0].size();
vector<int> top_2_bottom(row_size);
vector<int> left_2_right(col_size);
for (int i = 0; i < row_size; i++)
{
top_2_bottom[i] = *max_element(grid[i].begin(), grid[i].end());
}
for (int j = 0; j < col_size; j++)
{
int max_element = grid[0][j];
for (int i = 1; i < row_size; i++)
{
max_element = max(max_element, grid[i][j]);
}
left_2_right[j] = max_element;
}
int res = 0;
for (int i = 0; i < row_size; i++)
{
for (int j = 0; j < col_size; j++)
{
res += min(top_2_bottom[i], left_2_right[j]) - grid[i][j];
}
}
return res;
}
};

[LeetCode] Keys and Rooms

发表于 2018-05-30 | 更新于: 2018-07-02 | 分类于 Algorithm

题目描述

There are N rooms and you start in room 0. Each room has a distinct number in 0, 1, 2, …, N-1, and each room may have some keys to access the next room.

Formally, each room i has a list of keys rooms[i], and each key rooms[i][j] is an integer in [0, 1, …, N-1] where N = rooms.length. A key rooms[i][j] = v opens the room with number v.

Initially, all the rooms start locked (except for room 0).

You can walk back and forth between rooms freely.

Return true if and only if you can enter every room.

Example 1:

Input: [[1],[2],[3],[]]
Output: true
Explanation:
We start in room 0, and pick up key 1.
We then go to room 1, and pick up key 2.
We then go to room 2, and pick up key 3.
We then go to room 3. Since we were able to go to every room, we return true.

Example 2:

Input: [[1,3],[3,0,1],[2],[0]]
Output: false
Explanation: We can’t enter the room with number 2.

Note:

1 <= rooms.length <= 1000
0 <= rooms[i].length <= 1000
The number of keys in all rooms combined is at most 3000.

给定一个二维数组,数组的每一行代表从当前房间可以进入的房间列表。从room-0 出发,要求求出是否可以进入到所有的房间。
本题中给定的数组可以认为是一个图,此问题就转换为从图的特定节点出发能否遍历全图的问题。可以使用bfs或者dfs 搜索解决。

C++ 实现

bfs 版本

1
2
3
4
5
6
7
8
9
10
11
12
13
14
15
16
17
18
19
20
21
22
23
24
25
26
27
28
29
30
31
32
33
34
35
36
37
38
class Solution {
public:
bool canVisitAllRooms(vector<vector<int>>& rooms) {
int size = rooms.size();
vector<bool> visited(size, false);
visited[0] = true;
for (const int room : rooms.front())
{
bfs(room, rooms, visited);
}

for (const bool v : visited)
{
if (!v) return false;
}
return true;
}
void bfs(const int start,
const vector<vector<int>>& rooms,
vector<bool>& visited)
{
queue<int> que;
que.push(start);
while(!que.empty())
{
int front = que.front();
visited[front] = true;
que.pop();
for (const int room : rooms[front])
{
if (!visited[room])
{
que.push(room);
}
}
}
}
};

dfs 版本

1
2
3
4
5
6
7
8
9
10
11
12
13
14
15
16
17
18
19
20
21
22
23
24
25
26
27
28
29
30
31
class Solution {
public:
bool canVisitAllRooms(vector<vector<int>>& rooms) {
int size = rooms.size();
vector<bool> visited(size, false);
visited[0] = true;
for (const int room : rooms.front())
{
dfs(room, rooms, visited);
}

for (const bool v : visited)
{
if (!v) return false;
}
return true;
}
void dfs(const int start,
const vector<vector<int>>& rooms,
vector<bool>& visited)
{
visited[start] = true;
for (const int room : rooms[start])
{
if (!visited[room])
{
dfs(room, rooms, visited);
}
}
}
};

[LeetCode] 01 Matrix

发表于 2018-05-29 | 更新于: 2018-07-02 | 分类于 Algorithm

题目描述

Given a matrix consists of 0 and 1, find the distance of the nearest 0 for each cell.

The distance between two adjacent cells is 1.
Example 1:

Input:
0 0 0
0 1 0
0 0 0
Output:
0 0 0
0 1 0
0 0 0

Example 2:

Input:
0 0 0
0 1 0
1 1 1
Output:
0 0 0
0 1 0
1 2 1

Note:
The number of elements of the given matrix will not exceed 10,000.
There are at least one 0 in the given matrix.
The cells are adjacent in only four directions: up, down, left and right.
输入是一个只包含0 1 的矩阵,要求输出每个元素和矩阵中0最近距离。

C++ 代码实现

动态规划版本,按照从上到下,从左到右的顺序遍历可以考虑到从左边以及上边到达的最短路径情况。然后再按照从下到上,从右到左的顺序遍历可以考虑到从右边以及下边到达的最短路径。因此动态规划需要一次正序遍历,一次逆序遍历。

1
2
3
4
5
6
7
8
9
10
11
12
13
14
15
16
17
18
19
20
21
22
23
24
25
26
27
28
29
30
31
32
33
34
35
36
37
38
39
40
41
42
43
44
45
46
class Solution {
public:
vector<vector<int>> updateMatrix(vector<vector<int>>& matrix) {
int row_size = matrix.size();
if (row_size == 0) return vector<vector<int>>();
int col_size = matrix[0].size();
vector<vector<int>> res(row_size,vector<int>(col_size));
// forward loop
for (int i = 0; i < row_size; i++)
{
for (int j = 0; j < col_size; j++)
{
if (matrix[i][j] == 0)
{
res[i][j] = 0;
}
else
{
int left = INT_MAX - 1;
int top = INT_MAX - 1;
if (i - 1 >= 0) top = res[i - 1][j];
if (j - 1 >= 0) left = res[i][j - 1];
res[i][j] = min(INT_MAX - 1, min(left,top) + 1);
}
}
}
// reverse loop

for (int i = row_size - 1; i >= 0; i--)
{
for (int j = col_size - 1; j >= 0; j--)
{
if (res[i][j] != 0 && res[i][j] != 1)
{
int down = INT_MAX - 1;
int right = INT_MAX - 1;
if (i + 1 < row_size) down = res[i + 1][j];
if (j + 1 < col_size) right = res[i][j + 1];
res[i][j] = min(res[i][j], min(down,right) + 1);
}
}
}

return res;
}
};

BFS 的解法如下

1
2
3
4
5
6
7
8
9
10
11
12
13
14
15
16
17
18
19
20
21
22
23
24
25
26
27
28
29
30
31
32
33
34
35
36
37
38
39
40
41
42
43
44
45
46
47
48
class Solution {
public:
vector<vector<int>> updateMatrix(vector<vector<int>>& matrix) {
int row_size = matrix.size();
int col_size = matrix[0].size();
queue<pair<int,int>> queue;
for (int i = 0; i < row_size; i++)
{
for (int j = 0; j < col_size; j++)
{
if (matrix[i][j] == 0)
{
queue.push({i, j});
}
else
{
matrix[i][j] = INT_MAX;
}
}
}
vector<pair<int,int>> directions = {{0,1},{1,0},{0,-1},{-1,0}};

while(!queue.empty())
{
const auto front = queue.front();
queue.pop();
int x = front.first;
int y = front.second;
for (const auto direction : directions)
{
int newx = x + direction.first;
int newy = y + direction.second;
if ( newx < 0
|| newy < 0
|| newx >= row_size
|| newy >= col_size
|| matrix[newx][newy] <= matrix[x][y] + 1)
{
continue;
}
matrix[newx][newy] = matrix[x][y] + 1;
queue.push({newx, newy});
}
}

return matrix;
}
};

[LeetCode] Add One Row to Tree

发表于 2018-05-29 | 更新于: 2018-07-02 | 分类于 Algorithm

题目描述

Given the root of a binary tree, then value v and depth d, you need to add a row of nodes with value v at the given depth d. The root node is at depth 1.

The adding rule is: given a positive integer depth d, for each NOT null tree nodes N in depth d-1, create two tree nodes with value v as N’s left subtree root and right subtree root. And N’s original left subtree should be the left subtree of the new left subtree root, its original right subtree should be the right subtree of the new right subtree root. If depth d is 1 that means there is no depth d-1 at all, then create a tree node with value v as the new root of the whole original tree, and the original tree is the new root’s left subtree.

Example 1:

Input:
A binary tree as following:

1
2
3
4
5
     4
/ \
2 6
/ \ /
3 1 5

v = 1
d = 2
Output:

1
2
3
4
5
6
7
      4
/ \
1 1
/ \
2 6
/ \ /
3 1 5

Example 2:

Input:
A binary tree as following:

1
2
3
4
5
    4
/
2
/ \
3 1

v = 1
d = 3
Output:

1
2
3
4
5
6
7
      4
/
2
/ \
1 1
/ \
3 1

Note:
The given d is in range [1, maximum depth of the given tree + 1].
The given binary tree has at least one tree node.
输入是一个二叉树,要求在指定的行插入新的一行后返回新的二叉树。

解题思路

典型的二叉树的层序遍历,遍历到指定的深度的时候,返回该层的所有node,执行插入操作。需要注意的是,题目认为树根的level 是1,需要对要求在level 1 插入的情况进行特殊处理。在使用queue 进行树的层序遍历时,每次while循环都记录queue的大小,当前queue存储当前层的所有节点。

C++ 实现

1
2
3
4
5
6
7
8
9
10
11
12
13
14
15
16
17
18
19
20
21
22
23
24
25
26
27
28
29
30
31
32
33
34
35
36
37
38
39
40
41
42
43
44
45
46
47
48
49
50
51
52
53
54
55
56
57
class Solution {
public:
TreeNode* addOneRow(TreeNode* root, int v, int d) {
// 处理level 1 的特殊情况
if (d == 1)
{
TreeNode* new_root = new TreeNode(v);
new_root->left = root;
return new_root;
}
// 开始层序遍历
int depth = 2;
queue<TreeNode*> que;
que.push(root);
while (depth < d)
{
// 使用queue 的size 记录当前level 的节点个数
// 每次while循环处理一层
int size = que.size();
for (int i = 0; i < size; i++)
{
const TreeNode* front = que.front();
que.pop();
if (front->left)
{
que.push(front->left);
}
if (front->right)
{
que.push(front->right);
}
}
// 处理完一层,计数++
depth++;
}
// 退出循环后 queue中存储的插入的节点
// 遍历queue 中所有节点,执行插入
while (!que.empty())
{
TreeNode* const node = que.front();
que.pop();
TreeNode* left = node->left;
TreeNode* right = node->right;

TreeNode* new_node = new TreeNode(v);
node->left = new_node;
new_node->left = left;

new_node = new TreeNode(v);
node->right = new_node;
new_node->right = right;

}

return root;
}
};

[LeetCode] Accounts Merge

发表于 2018-05-29 | 更新于: 2018-07-02 | 分类于 Algorithm

题目描述

Given a list accounts, each element accounts[i] is a list of strings, where the first element accounts[i][0] is a name, and the rest of the elements are emails representing emails of the account.

Now, we would like to merge these accounts. Two accounts definitely belong to the same person if there is some email that is common to both accounts. Note that even if two accounts have the same name, they may belong to different people as people could have the same name. A person can have any number of accounts initially, but all of their accounts definitely have the same name.

After merging the accounts, return the accounts in the following format: the first element of each account is the name, and the rest of the elements are emails in sorted order. The accounts themselves can be returned in any order.

Example 1:

Input:
accounts = [[“John”, “johnsmith@mail.com“, “john00@mail.com“], [“John”, “johnnybravo@mail.com“], [“John”, “johnsmith@mail.com“, “john_newyork@mail.com“], [“Mary”, “mary@mail.com“]]
Output: [[“John”, 'john00@mail.com‘, 'john_newyork@mail.com‘, 'johnsmith@mail.com‘], [“John”, “johnnybravo@mail.com“], [“Mary”, “mary@mail.com“]]
Explanation:
The first and third John’s are the same person as they have the common email “johnsmith@mail.com“.
The second John and Mary are different people as none of their email addresses are used by other accounts.
We could return these lists in any order, for example the answer [[‘Mary’, 'mary@mail.com‘], [‘John’, 'johnnybravo@mail.com‘],
[‘John’, 'john00@mail.com‘, 'john_newyork@mail.com‘, 'johnsmith@mail.com‘]] would still be accepted.

Note:

The length of accounts will be in the range [1, 1000].
The length of accounts[i] will be in the range [1, 10].
The length of accounts[i][j] will be in the range [1, 30].

输入是string 型的二维数组,数组的每一行代表账户信息,其中每一行的第一个元素代表用户名称,其他元素代表邮箱。认为有相同邮箱的账户属于同一账户。要求把所有属于同一账户的信息合并起来。
解决此题的思路是遍历数组构建树,把相同的email 连接起来,然后针对每个email 使用bfs 搜索找到属于同一用户的全部email并存储到set中。

C++ 实现

1
2
3
4
5
6
7
8
9
10
11
12
13
14
15
16
17
18
19
20
21
22
23
24
25
26
27
28
29
30
31
32
33
34
35
36
37
38
39
40
41
42
43
44
45
46
47
48
49
50
51
52
53
54
55
56
57
58
59
60
61
62
63
64
65
66
67
68
69
70
71
72
73
74
75
76
class Solution {
public:
vector<vector<string>> accountsMerge(vector<vector<string>>& accounts) {
unordered_map<string,vector<int>> email_2_indices;
for (int i = 0; i < accounts.size(); i++)
{
for (int j = 1; j < accounts[i].size(); j++)
{
if (email_2_indices.count(accounts[i][j]))
{
email_2_indices[accounts[i][j]].push_back(i);
}
else
{
email_2_indices[accounts[i][j]] = {i};
}
}
}
vector<vector<string>> res;
unordered_set<string> visited;
for (const auto email_2_index : email_2_indices)
{
const auto& email = email_2_index.first;
const auto& index = email_2_index.second;
const string& name = accounts[index[0]].front();
vector<string> name_and_email;
name_and_email.emplace_back(name);
if(visited.count(email) == 0)
{
for (const auto& mail : bfs(accounts,email_2_indices,email,visited))
{
name_and_email.emplace_back(mail);
}
res.emplace_back(name_and_email);
}
}
return res;
}

private:
set<string> bfs(const vector<vector<string>>& accounts,
const unordered_map<string,vector<int>>& email_2_indices,
const string& email,
unordered_set<string>& visited) const
{
set<string> res;

queue<string> que;
que.push(email);

while(!que.empty())
{
const string front = que.front();
res.insert(front);
que.pop();
if (visited.count(front) == 0)
{
const vector<int>& indices = email_2_indices.at(front);
for (const int index : indices)
{
for (int i = 1; i < accounts[index].size(); i++)
{
if (visited.count(accounts[index][i]) == 0)
{
que.push(accounts[index][i]);
}
}
}
}
visited.insert(front);
}

return res;

}
};

CRP算法以及OSRM实现

发表于 2018-05-22 | 更新于: 2018-05-22 | 分类于 Routing Algorithm


阅读全文 »
12345
carbo06@163.com

carbo06@163.com

About Linux C++ and routing algorithms.

45 日志
5 分类
18 标签
GitHub E-Mail
Friends
  • DingliYang
  • SongZhang
© 2018 carbo06@163.com
0%