Carbon's Blog

以梦为马 不负韶华


  • 首页

  • 标签

  • 分类

  • 归档

  • 搜索

[LeetCode] Pyramid Transition Matrix

发表于 2018-07-13 | 更新于: 2018-07-13 | 分类于 Algorithm

题目描述

We are stacking blocks to form a pyramid. Each block has a color which is a one letter string, like 'Z'.

For every block of color C we place not in the bottom row, we are placing it on top of a left block of color A and right block of color B. We are allowed to place the block there only if (A, B, C) is an allowed triple.

We start with a bottom row of bottom, represented as a single string. We also start with a list of allowed triples allowed. Each allowed triple is represented as a string of length 3.

Return true if we can build the pyramid all the way to the top, otherwise false.

Example 1:

1
2
3
4
5
6
7
8
9
10
11
Input: bottom = "XYZ", allowed = ["XYD", "YZE", "DEA", "FFF"]
Output: true
Explanation:
We can stack the pyramid like this:
A
/ \
D E
/ \ / \
X Y Z

This works because ('X', 'Y', 'D'), ('Y', 'Z', 'E'), and ('D', 'E', 'A') are allowed triples.

Example 2:

1
2
3
4
5
Input: bottom = "XXYX", allowed = ["XXX", "XXY", "XYX", "XYY", "YXZ"]
Output: false
Explanation:
We can't stack the pyramid to the top.
Note that there could be allowed triples (A, B, C) and (A, B, D) with C != D.

Note:
bottom will be a string with length in range [2, 8].
allowed will have length in range [0, 200].
Letters in all strings will be chosen from the set {‘A’, ‘B’, ‘C’, ‘D’, ‘E’, ‘F’, ‘G’}.

输入是一个叫bottom 的字符串以及allowed 数组,bottom 字符串代表金字塔的最底层,allowed 数组给出了所有可能的金字塔的构建方法。给定这两个数组后判断是否能建成金字塔。
解题思路是使用递归的方式,每次递归构建出上一层,递归的终止条件是当前层只有一个字符。
需要注意的是,每次递归时需要使用dfs 搜索找出当前层所有可能的构造方式。具体见实现以及注释。

C++ 实现

1
2
3
4
5
6
7
8
9
10
11
12
13
14
15
16
17
18
19
20
21
22
23
24
25
26
27
28
29
30
31
32
33
34
35
36
37
38
39
40
41
42
43
44
45
46
47
48
49
50
51
52
53
54
55
56
57
58
59
60
61
62
63
64
65
66
67
68
69
70
71
72
class Solution {
public:
bool pyramidTransition(string bottom, vector<string>& allowed) {
// 构建allowed_map, hash_map 的key是小金子塔的底部,value 是所有允许的顶部的集合
for (const string& str : allowed)
{
const string& key = str.substr(0, 2);
const char value = str.back();
if (allowed_map.count(key))
{
allowed_map[key].insert(value);
}
else
{
allowed_map[key] = {value};
}
}
// 递归搜索
return dfs(bottom);
}
private:
unordered_map<string, set<char>> allowed_map;

bool dfs(const string& bottom)
{
// 终止条件
if (bottom.size() == 1) return true;
// 首先判断上一层无法构建的情况,如果无法构建直接return false
for(size_t i = 0; i < bottom.size() - 1; i++)
{
if (!allowed_map.count(bottom.substr(i, 2)))
{
return false;
}
}
vector<string> candidates;
candidates.reserve(bottom.size() - 1);
string path;
//使用dfs的方式找到上一层所有可能结果
getCandidates(bottom, 0, path, candidates);
//遍历所有结果进行递归搜索
for(const string& candidate : candidates)
{
if (dfs(candidate))
{
return true;
}
}
return false;
}
// dfs的方式找到所有可能的上一层的结果
// 结果存储到 candidates 数组中
// cur 存储当前dfs的进度
void getCandidates(const string& bottom,
size_t idx,
string& cur,
vector<string>& candidates)
{
if (idx == bottom.size() - 1)
{
candidates.push_back(cur);
return;
}

for(const char c : allowed_map.at(bottom.substr(idx, 2)))
{
cur += c;
getCandidates(bottom, idx + 1, cur, candidates);
cur.pop_back();
}
}
};

C++ 将git提交信息编译到可执行文件

发表于 2018-07-12 | 更新于: 2018-07-12 | 分类于 Tools

在生产环境中经常需要查看在线上运行的程序对应git的哪次提交。
我们可以在编译时获取git 最后一次提交信息GIT_SHA1 宏,C++ 程序通过访问GIT_SHA1宏可以输出和git仓库的提交信息。
使用Makefile时,在Makefile 添加以下

1
CPPFLAGS+=-DGIT_SHA1="$(shell git log --format='[sha1]:%h [author]:%cn [time]:%ci [commit]:%s [branch]:%d' -1)"

使用cmake

1
2
3
4
5
6
exec_program(
"git"
${CMAKE_CURRENT_SOURCE_DIR}
ARGS "log --format='[sha1]:%h [author]:%cn [time]:%ci [commit]:%s [branch]:%d' -1"
OUTPUT_VARIABLE VERSION_SHA1 )
add_definitions( -DGIT_SHA1="${VERSION_SHA1}" )

如果不想直接使用宏变量,可以使用cmake 提供的configure_file 访问CMakeLists.txt 中定义的各种变量.
configure_file的功能是根据 xxx.hpp.in文件中定义的宏创建 xxx.hpp 文件。关于configure_file 的说明见 configure_file

[LeetCode] Kth Smallest Element in a Sorted Matrix

发表于 2018-07-12 | 更新于: 2018-07-12 | 分类于 Algorithm

题目描述

Given a n x n matrix where each of the rows and columns are sorted in ascending order, find the kth smallest element in the matrix.

Note that it is the kth smallest element in the sorted order, not the kth distinct element.

Example:

matrix = [
[ 1, 5, 9],
[10, 11, 13],
[12, 13, 15]
],
k = 8,
return 13.

Note:
You may assume k is always valid, 1 ≤ k ≤ n2.
输入是一个二维矩阵,二维矩阵的每行每列都有序,要求求出矩阵所有数值的第k 小的数。
解题思路是使用一个优先队列(堆)存储矩阵的数值,优先队列pop (k - 1) 次后,位于堆顶的值就是第k 小的数值。由于二维矩阵的每行每列都有序,因此我们使用矩阵的第一行或者第一列初始化堆,每pop 一个节点,将节点下侧(右侧)的数入堆。
需要注意的是 c++ 中提供的priority_queue 默认是大根堆,需要重载节点的比较运算符实现小根堆的功能。

C++ 实现

1
2
3
4
5
6
7
8
9
10
11
12
13
14
15
16
17
18
19
20
21
22
23
24
25
26
27
28
29
30
31
32
33
34
35
36
37
38
39
40
class Solution {
public:
int kthSmallest(vector<vector<int>>& matrix, int k) {
const size_t m = matrix.size();
if (matrix.empty()) return -1;
const size_t n = matrix[0].size();

struct Node
{
size_t x;
size_t y;
int val;

bool operator < (const Node& other) const
{
return val >= other.val;
}
};

priority_queue<Node> pq;
for (size_t j = 0; j < n; j++)
{
pq.push({0, j, matrix[0][j]});
}

for (int i = 0; i < k - 1; i++)
{
const Node& top = pq.top();
const size_t x = top.x;
const size_t y = top.y;
pq.pop();
if (x == m - 1)
{
continue;
}
pq.push({x + 1, y, matrix[x + 1][y]});
}
return pq.top().val;
}
};

rundeck CentOS 部署以及配置

发表于 2018-07-11 | 更新于: 2018-09-04 | 分类于 Tools

简介

rundeck 是一个在多机器环境下实现自动化执行以及调度任务的开源工具。rundeck 提供了web 界面,用户可以通过web 界面定制任务,调度,观察节点的执行情况。

安装与配置

安装

rundeck 的官网位置rundeck
rundeck 运行依赖于java,因此需要首先安装并配置java

1
yum install java-1.8.0-openjdk java-1.8.0-openjdk-devel -y

在 /etc/profile.d 目录下创建 java.sh, 在java.sh 中写入

1
2
3
4
5
#!/bin/bash
JAVA_HOME=/usr/bin/java
PATH=$JAVA_HOME/bin:$PATH
export PATH JAVA_HOME
export CLASSPATH=.

为java.sh 添加执行权限

1
chmod +x /etc/profile.d/java.sh

使java环境变量生效

1
source /etc/profile.d/java.sh

使用yum 安装rundeck

1
2
rpm -Uvh http://repo.rundeck.org/latest.rpm
yum install rundeck

如果使用yum 安装失败,可以使用rpm 的方式安装。

1
2
3
wget http://download.rundeck.org/rpm/rundeck-2.11.5-1.56.GA.noarch.rpm
wget http://download.rundeck.org/rpm/rundeck-config-2.11.5-1.56.GA.noarch.rpm
rpm -i rundeck-2.11.5-1.56.GA.noarch.rpm rundeck-config-2.11.5-1.56.GA.noarch.rpm

启动rundeck 服务

1
/etc/init.d/rundeckd start

检查rundeck 是否启动

1
2
ps -ef | grep rundeck
netstat -anp | grep 4440

配置

更改默认用户名密码

rundeck 默认用户名密码都是admin,可以更改/etc/rundeck/realm.properties 文件中相应位置。更改后重启rundeck 服务

1
service rundeckd restart

更改根url设置

如果只在部署rundeck的机器访问rundeck web界面则不需要

1
2
vim /etc/rundeck/rundeck-config.properties
vim /etc/rundeck/framework.properties

把这两个文件中所有的localhost 更改为本机的ip地址然后保存

添加node节点

在下面示例中展示

示例

在浏览器中输入rundeck 地址,以我部署的服务为例http://10.4.227.26:4440/
这里写图片描述
默认输入 admin admin 登录, 登录后新建一个project
这里写图片描述
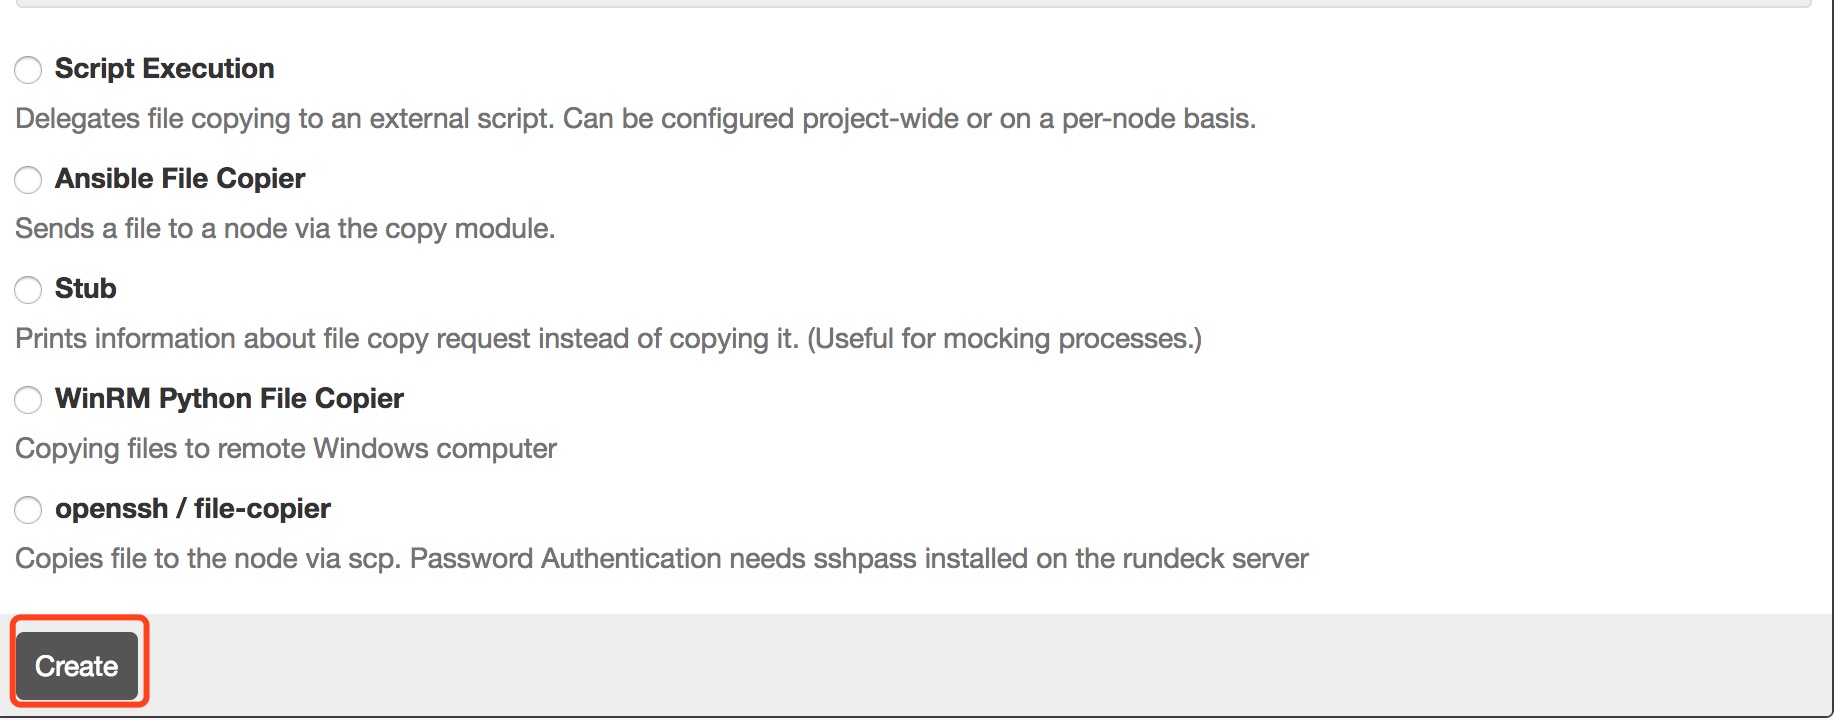
输入新建project 的名称以及描述其他按照默认选择,以test 为例,滚动到页面最后点击create 创建
这里写图片描述
avatar
下一步继续按照默认配置保存
新建工程后,我们查看工程下的node 节点
avatar
可以看到默认情况工程下只有server node 节点。为了添加其他节点,我们进入到 /var/rundeck/projects/test/etc 路径,编辑resources.xml 文件,默认情况resources.xml 下只有server node, 如下图

1
2
3
4
5
<?xml version="1.0" encoding="UTF-8"?>

<project>
<node name="10.4.227.26" description="Rundeck server node" tags="" hostname="10.4.227.26" osArch="amd64" osFamily="unix" osName="Linux" osVersion="3.10.0-123.el7.x86_64" username="rundeck"/>
</project>

以10.4.227.21为例,添加node节点,添加client node 节点后配置如下

1
2
3
4
5
6
<?xml version="1.0" encoding="UTF-8"?>

<project>
<node name="10.4.227.26" description="Rundeck server node" tags="" hostname="10.4.227.26" osArch="amd64" osFamily="unix" osName="Linux" osVersion="3.10.0-123.el7.x86_64" username="rundeck"/>
<node name="10.4.227.21" description="Rundeck client node" tags="" hostname="10.4.227.21" osArch="amd64" osFamily="unix" osName="Linux" osVersion="3.10.0-123.el7.x86_64" username="ce39906"/>
</project>

新增的hostname username 需要配置正确。
完成配置后,刷新web 界面,可以看到新增的10.4.227.21
avatar
仅仅在rundeck server 添加如下配置不能实现rundeck server 到client 的无密码连接。因此,我们登录到rundeck client机器(10.4.227.21),将 rundeck server(10.4.227.26) /var/lib/rundeck/.ssh/id_rsa.pub 的内容追加到 client 机器中的 ~/.ssh/authorized_keys
以上就完成rundeck node 节点的添加。下面我们测试通过web 界面配置在指定的node 节点上执行命令
avatar
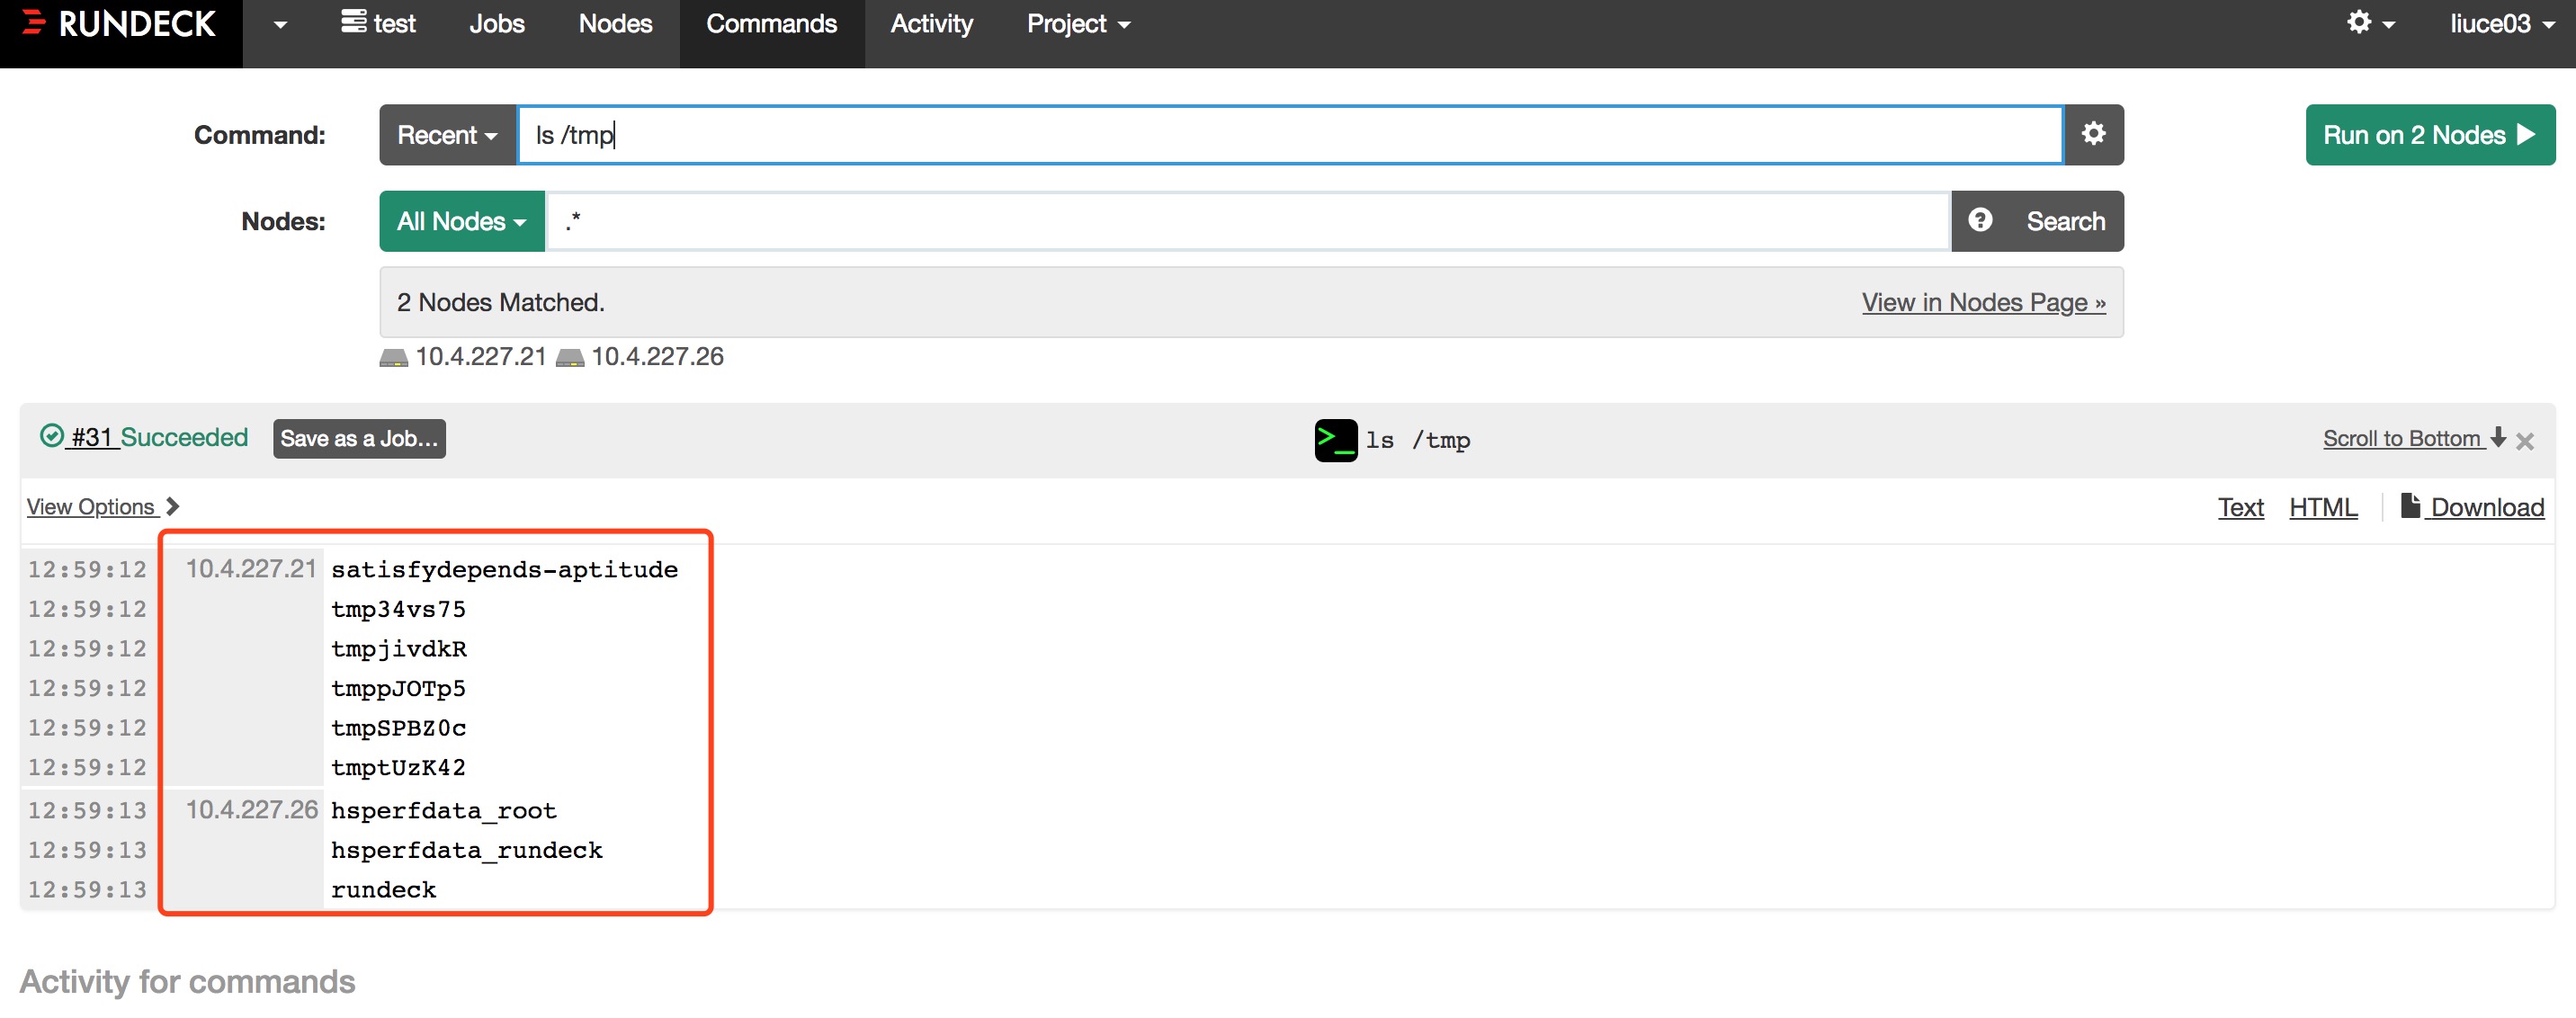
选择所有节点后,我们以执行 ls /tmp 为例
avatar
点击右上角的执行,执行结果如下
avatar
除了简单的命令,rundeck job 支持实现更加复杂的任务。我们以执行脚本为例进行说明。首先新建一个job
avatar
配置job 的名称以及描述
avatar
在step 中选择执行脚本任务
avatar
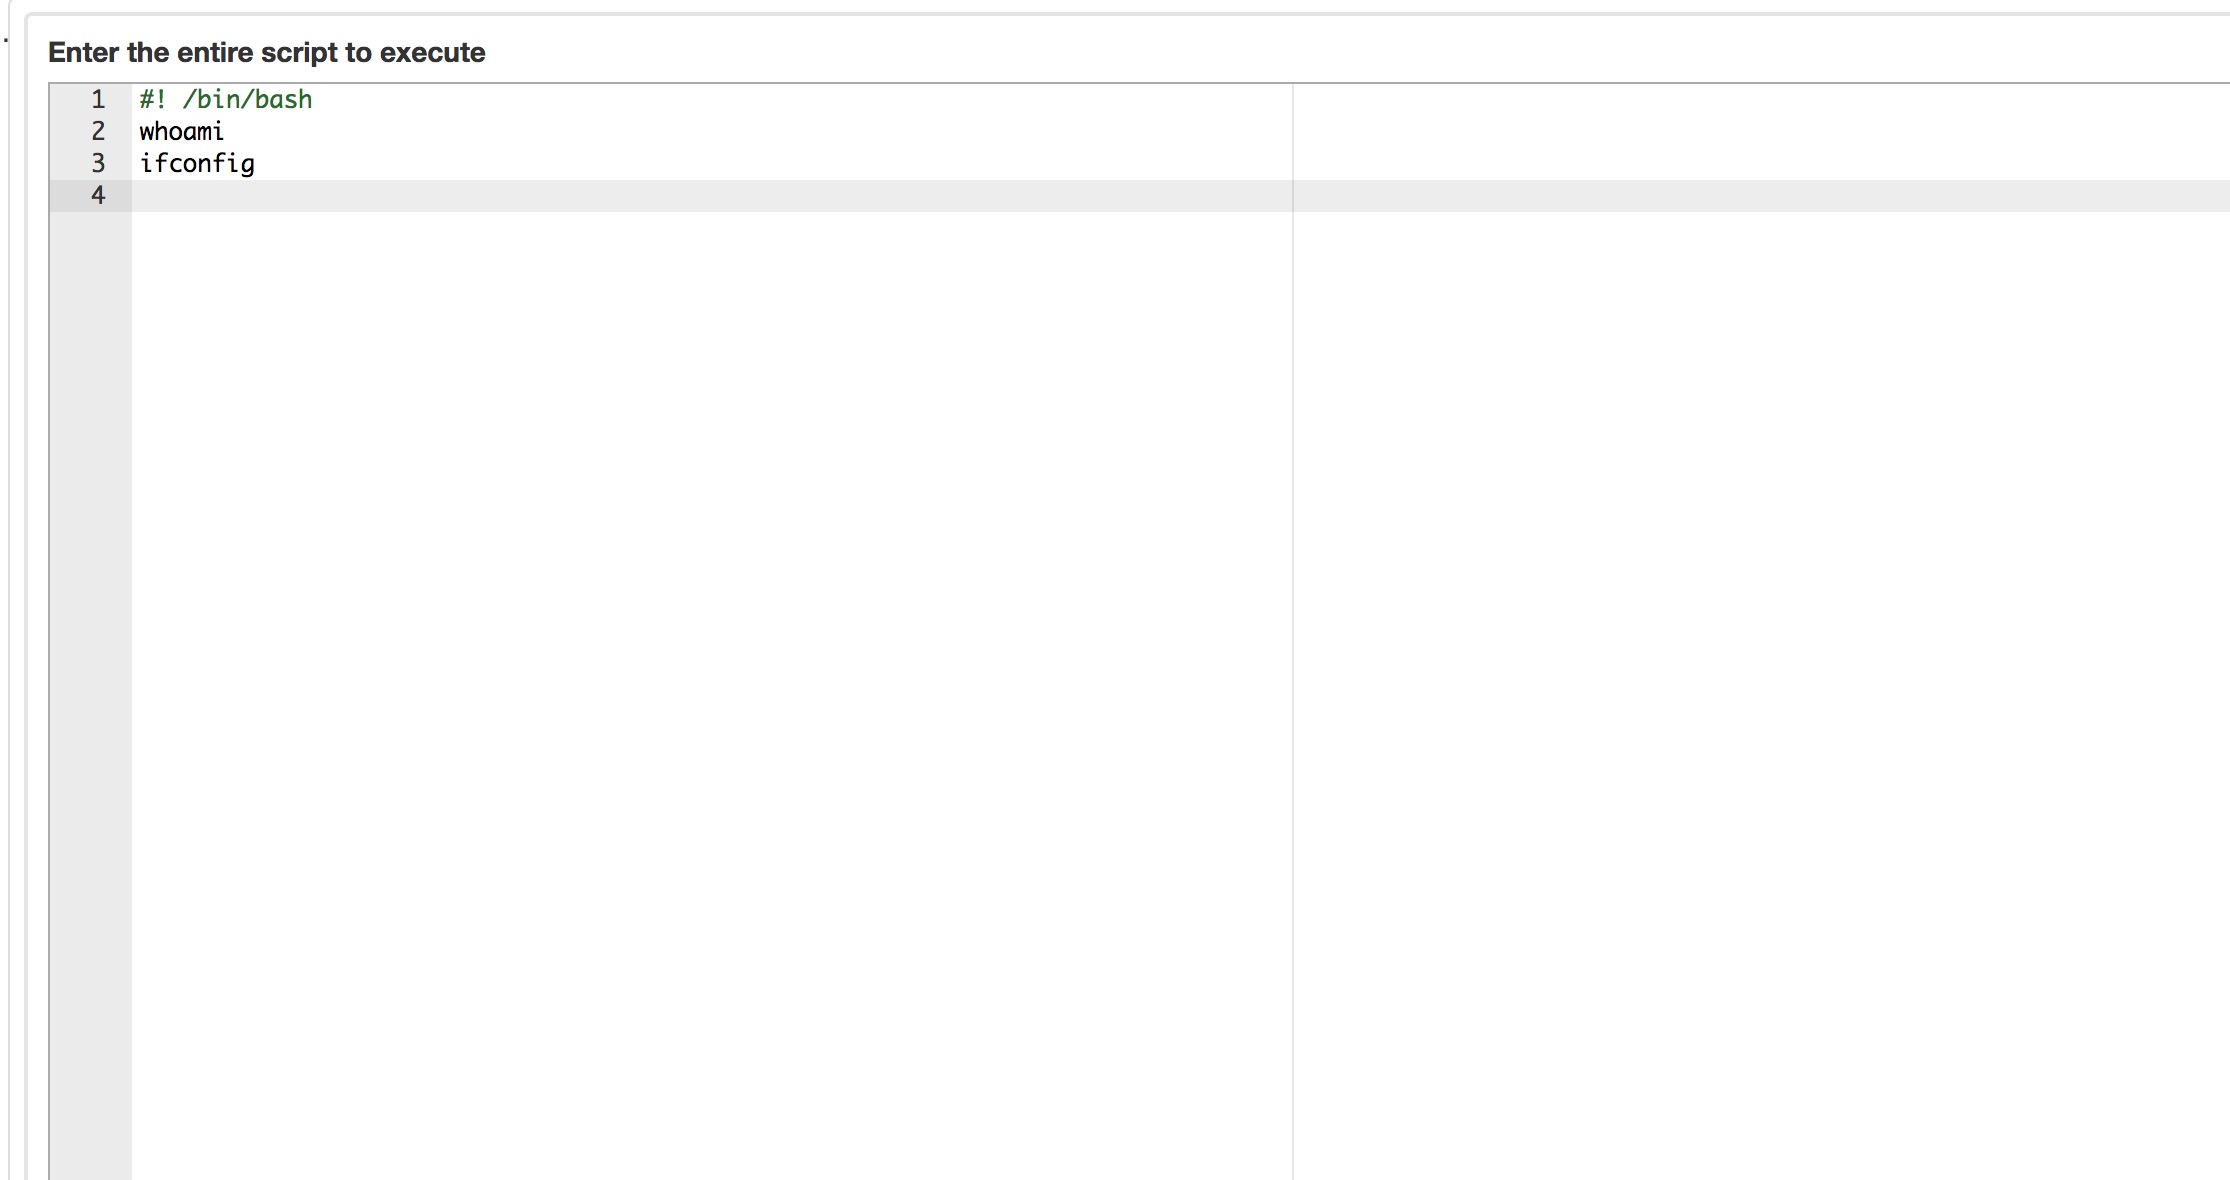
点击后编辑脚本并保存
avatar
选择执行job 的node, 这里我们选择client node(10.4.227.21) 执行
avatar
其他使用默认配置,点击创建,创建完成后执行job
avatar
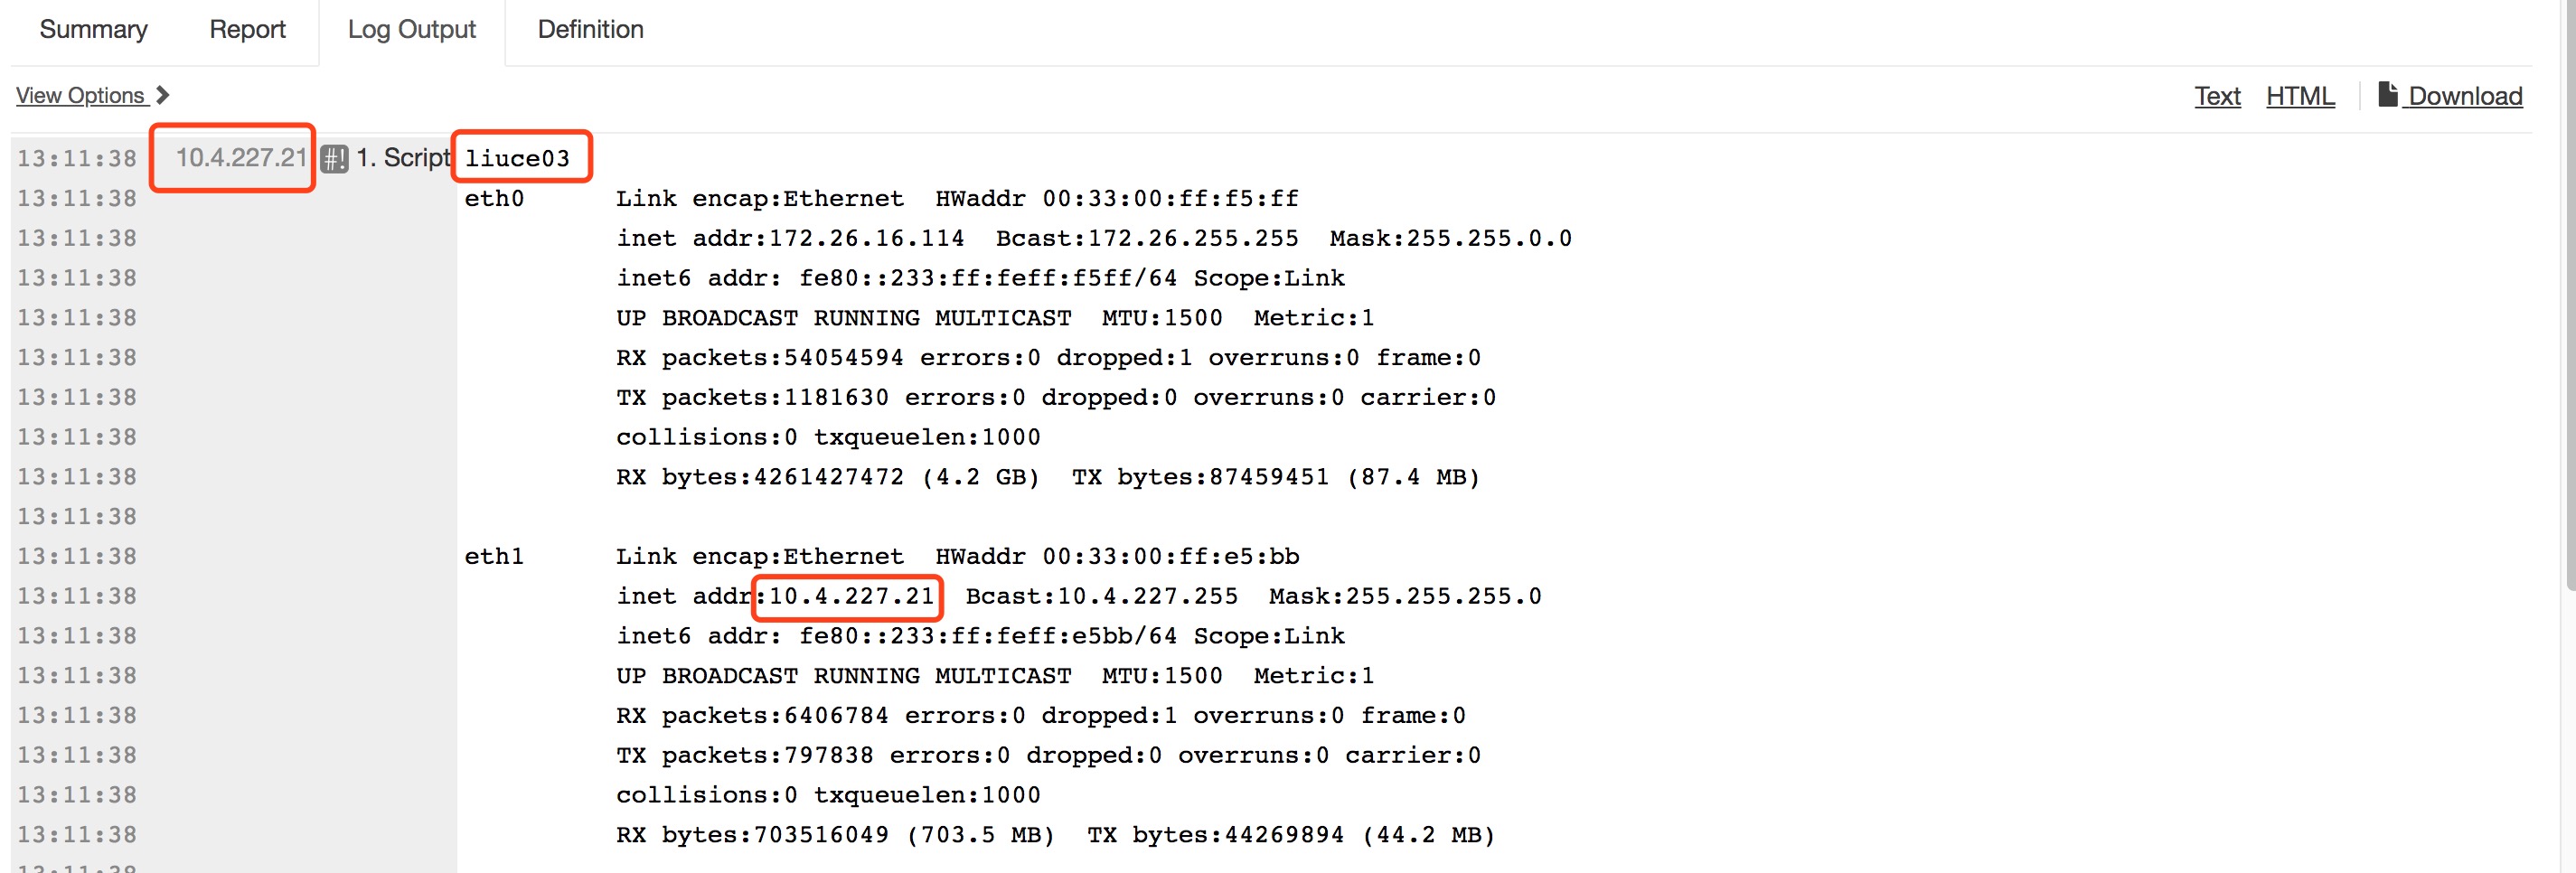
执行结果如下
avatar
可以看到在rundeck client 上执行了job 指定的脚本(执行 whoami 以及 ifconfig)

思考

rundeck 在完成初始配置后可以很方便用于在一组机器上执行各种任务,这种场景在生产环境以及日常运维中非常常见,类似的工具还有jenkins
前段时间公司部门要求开发自动部署工具,全套使用脚本+ ssh 的方式,健壮性和稳定性都存在不少问题。类似的自动部署的功能完全可以使用rundeck 配置job 的方式执行而不需要重新造轮子再搞一套鸡肋的东西。

[LeetCode] Smallest Subtree with all the Deepest Nodes

发表于 2018-07-09 | 更新于: 2018-07-09 | 分类于 Algorithm

题目描述

Given a binary tree rooted at root, the depth of each node is the shortest distance to the root.

A node is deepest if it has the largest depth possible among any node in the entire tree.

The subtree of a node is that node, plus the set of all descendants of that node.

Return the node with the largest depth such that it contains all the deepest nodes in it’s subtree.

Example 1:

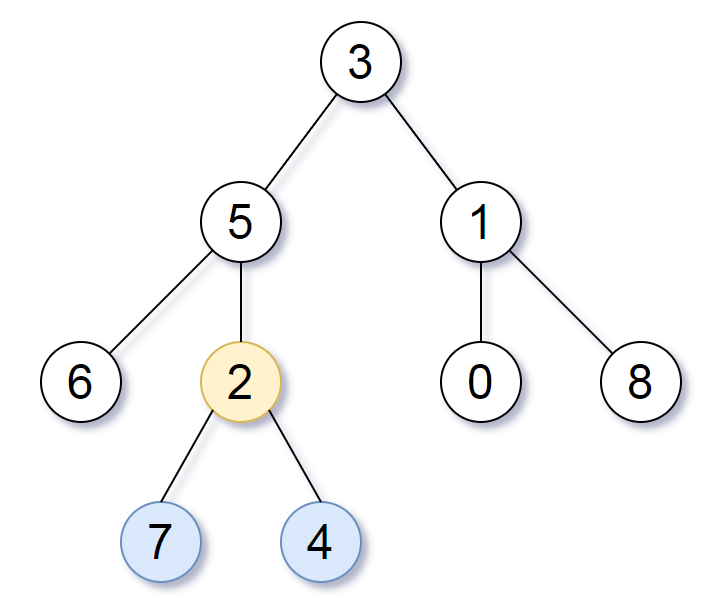
Input: [3,5,1,6,2,0,8,null,null,7,4]
Output: [2,7,4]
Explanation:
avatar
We return the node with value 2, colored in yellow in the diagram.
The nodes colored in blue are the deepest nodes of the tree.
The input “[3, 5, 1, 6, 2, 0, 8, null, null, 7, 4]” is a serialization of the given tree.
The output “[2, 7, 4]” is a serialization of the subtree rooted at the node with value 2.
Both the input and output have TreeNode type.

题目描述比较绕,其实实际意思比较直白,要求求出具有最高高度的子树的根节点,或者说是求具有最高高度的非叶子节点。
解决方案可以使用dfs搜索,每次搜索返回当前的根节点以及当前最大深度,如果左右子树深度一样,则返回根节点且深度加一,如果左子树的深度更深,返回左子树的根并且深度加一。相应的,右子树的深度更深,返回右子树的根并且深度加一。

C++ 实现

1
2
3
4
5
6
7
8
9
10
11
12
13
14
15
16
17
18
19
20
21
22
23
24
25
26
/**
* Definition for a binary tree node.
* struct TreeNode {
* int val;
* TreeNode *left;
* TreeNode *right;
* TreeNode(int x) : val(x), left(NULL), right(NULL) {}
* };
*/
class Solution {
public:
TreeNode* subtreeWithAllDeepest(TreeNode* root) {
const pair<int, TreeNode*> res = dfs(root);
return res.second;
}
private:
pair<int, TreeNode*> dfs(TreeNode* root)
{
if (!root) return {0, NULL};
const pair<int, TreeNode*> left = dfs(root->left);
const pair<int, TreeNode*> right = dfs(root->right);
if (left.first == right.first) return {left.first + 1, root};
if (left.first < right.first) return {right.first + 1, right.second};
return {left.first + 1, left.second};
}
};

[LeetCode] Implement Magic Dictionary

发表于 2018-07-06 | 更新于: 2018-07-06 | 分类于 Algorithm

题目描述

Implement a magic directory with buildDict, and search methods.

For the method buildDict, you’ll be given a list of non-repetitive words to build a dictionary.

For the method search, you’ll be given a word, and judge whether if you modify exactly one character into another character in this word, the modified word is in the dictionary you just built.

Example 1:

Input: buildDict([“hello”, “leetcode”]), Output: Null
Input: search(“hello”), Output: False
Input: search(“hhllo”), Output: True
Input: search(“hell”), Output: False
Input: search(“leetcoded”), Output: False

Note:
You may assume that all the inputs are consist of lowercase letters a-z.
For contest purpose, the test data is rather small by now. You could think about highly efficient algorithm after the contest.
Please remember to RESET your class variables declared in class MagicDictionary, as static/class variables are persisted across multiple test cases. Please see here for more details.

题目要求建立一个字典,查找一个word 改变并且只改变一个字符后在字典中是否存在。
解决思路是根据字符串的大小建立索引,如果字符串的大小在索引不存在则直接返回false, 如果存在则遍历字典中和待查询字符同样大小的字符串集合,查看是否有满足改变只改变一个字符后相等的字符串。

C++ 实现

1
2
3
4
5
6
7
8
9
10
11
12
13
14
15
16
17
18
19
20
21
22
23
24
25
26
27
28
29
30
31
32
33
34
35
36
37
38
39
40
41
42
43
44
45
46
47
48
49
50
51
52
53
54
55
56
57
58
59
60
61
62
63
64
65
66
67
68
class MagicDictionary {
public:
/** Initialize your data structure here. */
MagicDictionary() {

}

/** Build a dictionary through a list of words */
void buildDict(vector<string> dict) {
for (const string& str : dict)
{
const size_t size = str.size();
if (size_2_strs.count(size))
{
size_2_strs[size].emplace_back(str);
}
else
{
size_2_strs[size] = vector<string>(1, str);
}
}
}

/** Returns if there is any word in the trie that equals to the given word after modifying exactly one character */
bool search(string word) {
const size_t size = word.size();
if (!size_2_strs.count(size))
{
return false;
}
const vector<string>& strs = size_2_strs.at(size);
for (const string& str : strs)
{
if (modifyOneEqual(str, word))
{
return true;
}
}
return false;
}
private:
unordered_map<size_t, vector<string>> size_2_strs;

bool modifyOneEqual(const string& one, const string& another)
{
const size_t size = one.size();
int diff_num = 0;
for (size_t i = 0; i < size; i++)
{
if (one[i] != another[i])
{
diff_num++;
}
if (diff_num > 1)
{
return false;
}
}
return diff_num == 1;
}
};

/**
* Your MagicDictionary object will be instantiated and called as such:
* MagicDictionary obj = new MagicDictionary();
* obj.buildDict(dict);
* bool param_2 = obj.search(word);
*/

该实现响应时间击败Leetcode 上其他100%

[LeetCode] House Robber III

发表于 2018-07-05 | 更新于: 2018-07-05 | 分类于 Algorithm

题目描述

The thief has found himself a new place for his thievery again. There is only one entrance to this area, called the “root.” Besides the root, each house has one and only one parent house. After a tour, the smart thief realized that “all houses in this place forms a binary tree”. It will automatically contact the police if two directly-linked houses were broken into on the same night.

Determine the maximum amount of money the thief can rob tonight without alerting the police.

Example 1:

1
2
3
4
5
  3
/ \
2 3
\ \
3 1

Maximum amount of money the thief can rob = 3 + 3 + 1 = 7.
Example 2:

1
2
3
4
5
    3
/ \
4 5
/ \ \
1 3 1

Maximum amount of money the thief can rob = 4 + 5 = 9.
Credits:
Special thanks to @dietpepsi for adding this problem and creating all test cases.

输入是一个二叉树,要求求出不具有父子关系的最大节点集合。
解题思路如下
最大值有以下两种可能

  1. 选择当前根节点: 当前节点数值 + 左子树最大值(不选择左子树的根节点) + 右子树最大值(不选择右子树的根节点)
  2. 不选择当前根节点: 左子树最大值 + 右子树最大值

我们可以使用递归的方式实现。每次递归运算返回两个值,一个代表选取当前根节点的最大值,一个代表不选取当前根节点的最大值。最后递归结束后,返回两个数值的最大值。

C++ 实现

1
2
3
4
5
6
7
8
9
10
11
12
13
14
15
16
17
18
19
20
21
22
23
24
25
26
27
28
29
30
31
32
/**
* Definition for a binary tree node.
* struct TreeNode {
* int val;
* TreeNode *left;
* TreeNode *right;
* TreeNode(int x) : val(x), left(NULL), right(NULL) {}
* };
*/
class Solution {
public:
int rob(TreeNode* root) {
if (root == NULL) return 0;
const pair<int, int> rob_or_not = robOrNot(root);
return max(rob_or_not.first, rob_or_not.second);
}
private:

// pair.first 存储不选取当前根节点的结果
// pair.second 存储选取当前根节点的结果
pair<int, int> robOrNot(TreeNode* root)
{
if (root == NULL) return {0, 0};
const pair<int, int> left = robOrNot(root->left);
const pair<int, int> right = robOrNot(root->right);
// 选择当前根节点的结果,由三部分组成
int rob_root = left.second + right.second + root->val;
// 不选择当前根节点的结果,由两部分组成
int not_rob_root = max(left.first, left.second) + max(right.first, right.second);
return {rob_root, not_rob_root};
}
};

[LeetCode] Print Binary Tree

发表于 2018-07-04 | 更新于: 2018-07-04 | 分类于 Algorithm

题目描述

Print a binary tree in an m*n 2D string array following these rules:

The row number m should be equal to the height of the given binary tree.
The column number n should always be an odd number.
The root node’s value (in string format) should be put in the exactly middle of the first row it can be put. The column and the row where the root node belongs will separate the rest space into two parts (left-bottom part and right-bottom part). You should print the left subtree in the left-bottom part and print the right subtree in the right-bottom part. The left-bottom part and the right-bottom part should have the same size. Even if one subtree is none while the other is not, you don’t need to print anything for the none subtree but still need to leave the space as large as that for the other subtree. However, if two subtrees are none, then you don’t need to leave space for both of them.
Each unused space should contain an empty string “”.
Print the subtrees following the same rules.
Example 1:

1
2
3
4
5
6
7
Input:
1
/
2
Output:
[["", "1", ""],
["2", "", ""]]

Example 2:

1
2
3
4
5
6
7
8
9
10
Input:
1
/ \
2 3
\
4
Output:
[["", "", "", "1", "", "", ""],
["", "2", "", "", "", "3", ""],
["", "", "4", "", "", "", ""]]

Example 3:

1
2
3
4
5
6
7
8
9
10
11
12
13
Input:
1
/ \
2 5
/
3
/
4
Output:
[["", "", "", "", "", "", "", "1", "", "", "", "", "", "", ""]
["", "", "", "2", "", "", "", "", "", "", "", "5", "", "", ""]
["", "3", "", "", "", "", "", "", "", "", "", "", "", "", ""]
["4", "", "", "", "", "", "", "", "", "", "", "", "", "", ""]]

Note: The height of binary tree is in the range of [1, 10].
输入是一个二叉树,要求将二叉树的打印到一个二维数组中,二维数组每行对应二叉树的每行,二维数组行数对应二叉树的高度。
解决思路是首先求得二叉树的高度,提前分配出二维数组,然后递归二叉树在二维数组中位置填写数值。递归每向下一次,二维数组中的行的位置就加一,列的位置是每次区间的中间值。如果是递归左子树的话就是左半区间,如果递归右子树的话就是右半区间。

C++ 实现

1
2
3
4
5
6
7
8
9
10
11
12
13
14
15
16
17
18
19
20
21
22
23
24
25
26
27
28
29
30
31
32
33
34
35
36
37
38
39
40
41
42
43
44
45
46
47
48
/**
* Definition for a binary tree node.
* struct TreeNode {
* int val;
* TreeNode *left;
* TreeNode *right;
* TreeNode(int x) : val(x), left(NULL), right(NULL) {}
* };
*/
class Solution {
public:
vector<vector<string>> printTree(TreeNode* root) {
if (!root)
{
return vector<vector<string>>{};
}
const size_t row = getTreeHeight(root);
const size_t col = (1 << row) - 1;
vector<vector<string>> res(row, vector<string>(col, ""));
populateTree(root, row, 0, 0, col - 1, res);
return res;
}
private:
size_t getTreeHeight(const TreeNode* root)
{
if (root == NULL)
{
return 0;
}
return 1 + max(getTreeHeight(root->left), getTreeHeight(root->right));
}

void populateTree(const TreeNode* root,
const size_t max_row,
const size_t row,
const size_t left,
const size_t right,
vector<vector<string>>& res)
{
if (!root || row == max_row)
{
return;
}
res[row][(left + right) >> 1] = to_string(root->val);
populateTree(root->left, max_row, row + 1, left, ((left + right) >> 1) - 1, res);
populateTree(root->right, max_row, row + 1, ((left + right) >> 1) + 1, right, res);
}
};

[LeetCode] Lemonade Change

发表于 2018-07-02 | 更新于: 2018-07-02 | 分类于 Algorithm

题目描述

At a lemonade stand, each lemonade costs $5.

Customers are standing in a queue to buy from you, and order one at a time (in the order specified by bills).

Each customer will only buy one lemonade and pay with either a \$5, \$10, or \$20 bill. You must provide the correct change to each customer, so that the net transaction is that the customer pays \$5.

Note that you don’t have any change in hand at first.

Return true if and only if you can provide every customer with correct change.

Example 1:

Input: [5,5,5,10,20]
Output: true
Explanation:
From the first 3 customers, we collect three $5 bills in order.
From the fourth customer, we collect a \$10 bill and give back a \$5.
From the fifth customer, we give a \$10 bill and a \$5 bill.
Since all customers got correct change, we output true.

Example 2:

Input: [5,5,10]
Output: true

Example 3:

Input: [10,10]
Output: false

Example 4:

Input: [5,5,10,10,20]
Output: false
Explanation:
From the first two customers in order, we collect two \$5 bills.
For the next two customers in order, we collect a \$10 bill and give back a \$5 bill.
For the last customer, we can’t give change of \$15 back because we only have two \$10 bills.
Since not every customer received correct change, the answer is false.

Note:

0 <= bills.length <= 10000
bills[i] will be either 5, 10, or 20.

有一个柠檬水摊,每瓶柠檬水售价5刀,货主只接收 5,10,20 的现金,问题是摊主是否可以按照购买的顺序完成找零。
解决思路是使用两个变量分别记录5元现金和10元现金的张数,每次交易的时候判断是否可以完成找零并更新现金数目

C++实现

1
2
3
4
5
6
7
8
9
10
11
12
13
14
15
16
17
18
19
20
21
22
23
24
25
26
27
28
29
30
31
32
33
34
35
36
37
38
39
40
41
class Solution {
public:
bool lemonadeChange(vector<int>& bills) {
unsigned five_cash_cnt = 0;
unsigned ten_cash_cnt = 0;

for (const int bill : bills)
{
switch (bill)
{
case 5:
five_cash_cnt++;
break;
case 10:
if (!five_cash_cnt)
{
return false;
}
five_cash_cnt--;
ten_cash_cnt++;
break;
case 20:
if (ten_cash_cnt && five_cash_cnt)
{
ten_cash_cnt--;
five_cash_cnt--;
}
else if (five_cash_cnt > 2)
{
five_cash_cnt -= 3;
}
else
{
return false;
}
break;
}
}
return true;
}
};

C++ cout打印uint8_t的正确方式

发表于 2018-06-29 | 更新于: 2018-09-04 | 分类于 Backend Development

问题现象

编译运行以下代码

1
2
3
4
5
6
7
8
9
10
11
12
13
14
15
/*************************************************************************
> File Name: cout_uint8.cpp
> Author: ce39906
> Mail: ce39906@163.com
> Created Time: 2018-06-29 13:50:53
************************************************************************/
#include <cstdint>
#include <iostream>

int main()
{
std::uint8_t uint8_num = 10;
std::cout << "uint8_t num is " << uint8_num << std::endl;
return 0;
}

编译

1
g++ cout_uint8.cpp --std=c++11 -o cout_uint8

运行得到的输出如下
avatar
cout没有正确打印数字10
产生这种情况的原因是很多c++ 实现中 uint8_t 是 unsigned char 的 typedef。因此cout 实际调用的函数是 ostream& operator<<(ostream&, unsigned char) ,因此实际的执行结果是打印对应的ASCII 码字符,而其字符是不可以打印的。

解决方案

将uint8_t 转化为unsigned 类型
使用一元运算符+(和- 运算符对应)
测试代码如下

1
2
3
4
5
6
7
8
9
10
11
12
13
14
15
16
17
18
19
/*************************************************************************
> File Name: cout_uint8.cpp
> Author: ce39906
> Mail: ce39906@163.com
> Created Time: 2018-06-29 13:50:53
************************************************************************/
#include <cstdint>
#include <iostream>
#include <typeinfo>

int main()
{
std::uint8_t uint8_num = 10;
std::cout << "uint8_t num is " << uint8_num << std::endl;
std::cout << "after cast to unsigned, uint8_t num is " << unsigned(uint8_num) << std::endl;
std::cout << "with a unary + operator, uint8_t num is " << +uint8_num << std::endl;
std::cout << "type of '+uint8_num' is " << typeid(+uint8_num).name() << std::endl;
return 0;
}

运行结果如下
avatar
可见使用+运算符的原理也是进行类型转换(把uint8_t 转为 int)

123…5
carbo06@163.com

carbo06@163.com

About Linux C++ and routing algorithms.

45 日志
5 分类
18 标签
GitHub E-Mail
Friends
  • DingliYang
  • SongZhang
© 2018 carbo06@163.com
0%