Carbon's Blog

以梦为马 不负韶华


  • 首页

  • 标签

  • 分类

  • 归档

  • 搜索

Tensorflow 解决路况状态分类问题

发表于 2018-09-03 | 更新于: 2018-09-03 | 分类于 Algorithm

背景

路况在地图渲染时候,会针对不同的拥堵情况选择不同颜色。一般来讲,道路拥堵情况分为三个状态,畅通,拥堵,缓行,分别用绿色,黄色,红色来渲染。
我们面临的问题是,已知道路属性以及通行速度,需要对路况状态进行分类。解决方案是依据第三方路况提供的路况状态以及抓取的高德路况状态来训练一个三分类模型。

特征处理

应用的特征如下

feature description
speed 路况速度
maxspeed 道路最大速度
highway_level 道路等级,共有17种可能,使用one-hot-encoding
lanes 车道数
oneway 是否是单向路,使用one-hot-encoding

路况状态使用 0-1-2 分别表示畅通-拥堵-缓行
处理好的特征使用\t分割的文本处理,最后一列代表路况状态。

阅读全文 »

读书短评-《未来简史》

发表于 2018-08-25 | 更新于: 2018-08-25 | 分类于 Reading

断断续续花了三个月才读完,再次(上次是人类简史)惊叹于作者涉猎广阔,博学深刻。kindle上看到进度是90%的时候发现整书就结束了,剩下10%是参考文献。给跪了…
书中前半部分一个核心观点是讲从生物角度来看人类与其他高级哺乳动物并无巨大差别,人类所以胜利是依靠出众的合作能力。另一个核心观点是未来人类的目标是追求快乐以及获得永生,这个目标即使可能实现也一定先在领导身上实现,那时死亡这唯一公平的事也不复存在,因此也就很可能引发大的社会危机。
后半部分的核心观点是未来生物科技可能会让人变成超人类(当然也是领导先)。基于大量数据的人工智能算法在很多领域的表现会超过人类(包括艺术)。
不管啥算法的实现都需要写代码的吧,基于此,我写写代码肯定是足够混口饭吃的。

g++ warn_unused_result

发表于 2018-08-24 | 更新于: 2018-08-24 | 分类于 Backend Development

介绍

在编程过程中,有的函数我们需要确保函数的返回值必须被使用。但是如果函数使用者直接调用函数且不使用函数的返回值的话,g++ 不会给出warning。这样可能会导致很难寻觅的bug。如调用realloc函数,函数调用者必须使用函数的返回值获得重新分配内存的指针。
利用g++ common function attributes 中提供的warn_unused_result 可以保证函数的返回值在没有被使用的时候提示warning,如果在编译选项添加-Werror, 则在编译时就会提示编译错误。关于更多 g++ common function attributes 参见https://gcc.gnu.org/onlinedocs/gcc/Common-Function-Attributes.html

示例

测试代码如下

1
2
3
4
5
6
7
8
9
10
11
12
13
14
15
16
17
18
19
20
21
22
23
24
25
26
27
28
29
30
31
32
33
34
35
36
37
38
39
40
41
42
43
44
45
46
47
48
49
50
51
52
53
54
55
56
/*************************************************************************
> File Name: warn_unused_result.cpp
> Author: ce39906
> Mail: ce39906@163.com
> Created Time: 2018-08-24 14:04:00
************************************************************************/

__attribute__ ((warn_unused_result))
int f(int x)
{
return x / 2;
}

__attribute__ ((warn_unused_result))
double f1()
{
return 0.;
}

class EmptyClass
{
};

__attribute__ ((warn_unused_result))
EmptyClass f2()
{
return EmptyClass();
}

class NotEmptyClass
{
int a;
};

__attribute__ ((warn_unused_result))
NotEmptyClass f3()
{
return NotEmptyClass();
}

int main()
{
// cause unused_result warning
f(3);
// no unused_result warning
int x = f(3);
(void) x;
// cause unused_result warning
f1();
// cause unused_result warning
f2();
// no unused_result warning. WHY??
f3();

return 0;
}

编译

g++ -Wall -Wextra warn_unused_result.cpp -o warn_unused_result

编译输出如下
res
其中比较奇怪的现象是当函数返回一个非空的对象时,不会产生warning,比较诡异,至今没找到合理解释。

C++11 智能指针

发表于 2018-08-08 | 更新于: 2018-08-08 | 分类于 Backend Development

智能指针的思想

c++ 要求程序员自己管理内存,为程序员提供了更高自由度,但更高的自由度同时意味着更多责任。为了减少c++程序员在使用裸指针时可能带来的内存泄露,c++11 引入智能指针帮助程序员管理内存。智能指针背后的设计思想是RAII

unique_ptr

unique_ptr 设计的目的是保证指针变量只指向一个实体,避免出现有其他指针变量指向相同实体,或者此指针变量指向同类型的其他实体。可以理解为指针变量与实体之间是一对一的关系。
为了实现上述设计目标,unique_ptr 的拷贝构造函数以及赋值构造函数都声明为deleted(c++11引入,和将拷贝构造函数以及赋值构造函数声明为private实现的效果一致)。所以unique_ptr 只允许使用裸指针初始化或者使用其他unique_ptr移动构造。比较特殊的是,一个新的unique_ptr变量可以从返回值为unique_ptr的函数构造。

1
2
3
4
5
6
7
8
9
10
11
12
13
unique_ptr<int> p(new int(2));   // allowed
unique_ptr<int> p1(p); // not allowed
unique_ptr<int> p2 = p; // not allowed
unique_ptr<int> p3(std::move(p)); // allowed
unique_ptr<int> p4 = std::move(p) // allowed

unique_ptr<int> foo()
{
unique_ptr<int> p(new int(2));
return p;
}

unique_ptr<int> p5 = foo(); // allowed

在引入 unique_ptr 之前,存在一个叫做auto_ptr 的智能指针,auto_ptr 与 unique_ptr 不同点是auto_ptr没有禁止拷贝构造和赋值构造,并且在执行拷贝构造和赋值构造后,之前的指针变量指向null,再次解引用时会产生运行时错误,这就是auto_ptr被广为诟病的地方。unique_ptr只有在被显示移动的时候才会将实体的所有权交给其他变量。现auto_ptr已经弃用。

shared_ptr

unique_ptr 实现指针变量与实体之前一一对应关系,但是在实际应用中,我们经常存在多个指针变量共同指向一个实体的场景,当所有指针变量的生命周期结束时再释放相应的资源。shared_ptr 就是为了解决此问题而引入。
简单的来讲,shared_ptr 实现的原理是在内部使用一个引用计数,每当有一个新的指针变量绑定到实体上时内部的引用计数加一,如果有指针变量生命周期结束引用计数减一,当引用计数为0时,释放相应资源。
shared_ptr 可以使用 use_count() 方法查看引用计数大小。
在多线程的环境下使用shared_ptr的const成员方法不需要外部的同步机制,使用shared_ptr的非const方法时需要重载shared_ptr的原子方法防止数据竞争。
需要注意的是,shared_ptr的引用计数内部的实现原理是一个原子变量,因此在多线程的环境下有大量的shared_ptr变量的复制以及销毁的话会带来比较大的性能损耗,所以如果新的shared_ptr 变量不需要改变指向的实体的内容时应该按照 const reference的方式使用。这个问题在我实际开发中遇到过,问题比较隐蔽,花费了大量时间才定位到。

weak_ptr

weak_ptr 的定义

weak_ptr 是为了配合shared_ptr而引入,weak_ptr 指向shared_ptr 管理的对象但是不会增加shared_ptr内部的引用计数,也就是说,不管是否有weak_ptr 指向对象,只要是shared_ptr的引用计数为0时,对象也会被销毁。weak_ptr 没有重载 * 以及 -> 方法。weak_ptr 提供了use_count 查看观察的shared_ptr的引用计数,使用expired 方法判断shared_ptr 指向的对象是否被销毁,使用lock方法创建一个新的shared_ptr 变量。

shared_ptr 循环引用问题

考虑以下代码

1
2
3
4
5
6
7
8
9
10
11
12
13
14
15
16
17
18
19
20
21
22
23
24
25
26
27
28
29
30
31
32
33
34
35
36
37
38
39
40
41
42
43
44
45
46
47
48
49
#include <memory>
#include <iostream>

class B;

class A
{
public:
A()
{
std::cout << "A construct.\n";
}

~A()
{
std::cout << "A destruct.\n";
}

std::shared_ptr<B> pb;

};

class B
{
public:
B()
{
std::cout << "B construct.\n";
}

~B()
{
std::cout << "B destruct.\n";
}

std::shared_ptr<A> pa;

};

int main()
{
std::shared_ptr<A> a(new A());
std::shared_ptr<B> b(new B());

a->pb = b;
b->pa = a;

return 0;
}

编译后执行结果如下

A construct.
B construct.

可以看到,由于互相引用,shared_ptr a 以及 b 所管理的对象都没有释放。我们把上述代码中的类A 以及类B中成员变量都声明为weak_ptr 类型后重新编译运行后的结果如下

A construct.
B construct.
B destruct.
A destruct.

由此可见,weak_ptr 不会增加shared_ptr 的互相引用的问题,可以保证shared_ptr所管理的资源可以正确释放。

weak_ptr 与观察者模式

利用weak_ptr的特性,使用weak_ptr 以及shared_ptr配合可以实现观察者模式

Json library implemented by boost variant

发表于 2018-08-01 | 更新于: 2018-08-01 | 分类于 Backend Development

boost variant 介绍

boost variant 是一个不同union的泛型类,它用于存储和操作不同类型但在使用时存在<相同泛型>的对象。variant 在实现不同类型的泛型的同时,提供对其包含的具体类型的安全访问。
基于此性质,boost variant 可以应用于创建json 这种数据结构,我们把json 中的Object, Array, String, Number, True, False, Null 统一当做同一种variant 类型。需要注意的是,json 中的Object 和 Array 类型是递归的variant 类型,在声明时需要使用 boost::recursive_wrapper 修饰。boost::recursivee_wrapper用于创建包含创建的variant类型的表达式。
在访问varint 类型时,可以使用boost::get 以及 boost::apply_visitor 的形式。
更多关于 boost variant 的介绍见:
https://www.boost.org/doc/libs/1_62_0/doc/html/variant/reference.html

json 数据结构

json 的数据类型实现如下

1
2
3
4
5
6
7
8
9
10
11
12
13
14
15
16
17
18
19
20
21
22
23
24
25
26
27
28
29
30
31
32
33
34
35
36
37
38
39
40
41
42
43
44
45
46
47
48
49
50
51
52
53
54
55
56
57
58
59
60
61
62
63
64
65
66
67
68
69
70
71
72
73
74
75
76
77
78
79
80
81
82
83
84
85
86
87
88
89
90
91
92
93
94
95
96
97
98
99
100
101
102
103
104
105
106
107
/*************************************************************************
> File Name: json_type.hpp
> Author: ce39906
> Mail: ce39906@163.com
> Created Time: 2018-07-31 16:25:59
************************************************************************/
#ifndef JSON_TYPE_HPP
#define JSON_TYPE_HPP

#include <boost/variant.hpp>

#include <string>
#include <unordered_map>
#include <vector>

namespace json
{

struct Object;
struct Array;

struct String
{
String() {}
String(const char* value) : value{value} {}
String(std::string value) : value{std::move(value)} {}
std::string value;
};

struct Number
{
Number() {};
Number(const double value) : value{value} {}
double value;
};

struct True
{
};

struct False
{
};

struct Null
{
};

using Value = boost::variant<String,
Number,
boost::recursive_wrapper<Object>,
boost::recursive_wrapper<Array>,
True,
False,
Null>;

struct Object
{
bool isMember(const std::string& key) const
{
return values.count(key) != 0;
}

const Value& at(const std::string& key) const
{
return values.at(key);
}

const Value& operator[](const std::string& key) const
{
return values.at(key);
}

std::unordered_map<std::string, Value> values;
};

struct Array
{
const Value& at(const size_t idx) const
{
return values.at(idx);
}

const Value& operator[](const size_t idx) const
{
return values.at(idx);
}

size_t size() const
{
return values.size();
}

const Value& front() const
{
return values.front();
}

const Value& back() const
{
return values.back();
}

std::vector<Value> values;
};
} // ns json
#endif

json 数据访问

本节只介绍使用boost::get 访问varint数据。boost::apply_visitor 的方式在序列化的部分介绍
代码示例如下

1
2
3
4
5
6
7
8
9
10
11
12
13
14
15
16
17
18
19
20
21
22
23
24
25
26
27
28
29
30
31
32
33
34
35
36
37
38
39
namespace access
{

inline const Object& asObject(const Value& value)
{
return boost::get<Object>(value);
}

inline const Array& asArray(const Value& value)
{
return boost::get<Array>(value);
}

inline const String& asString(const Value& value)
{
return boost::get<String>(value);
}

inline const Number& asNumber(const Value& value)
{
return boost::get<Number>(value);
}

inline const True& asTrue(const Value& value)
{
return boost::get<True>(value);
}

inline const False& asFalse(const Value& value)
{
return boost::get<False>(value);
}

inline const Null& asNull(const Value& value)
{
return boost::get<Null>(value);
}

} // ns access
阅读全文 »

c++11 右值引用,移动构造函数,emplace_back 解析

发表于 2018-07-26 | 更新于: 2018-09-04 | 分类于 Backend Development

右值引用

C++11 引入了右值引用的概念,使用&&表示。
首先简单介绍右值的概念,简单的将,所有赋值语句右侧的都是右值,或者说所有没有名字的变量都是右值。例如

1
int a = 2;

a 中就是一个左值,相对的,2 就是一个右值。关于右值更详细严谨的介绍见https://en.cppreference.com/w/cpp/language/value_category

移动构造函数

在c++11 之前,类包括构造函数,析构函数,拷贝构造函数,赋值构造函数。对于存在指针变量的类来讲,其拷贝构造函数,赋值构造函数必须实现指针变量的深拷贝,这可能会涉及到比较耗时的操作(比如string 类存储了一个超长字符串,在调用其拷贝构造或赋值构造时需要超长字符串的拷贝)。
移动构造函数相对拷贝构造函数和赋值构造函数而言不会进行成员变量的深拷贝而是交换其所有权,这样就避免的拷贝时带来的性能损耗。
移动构造的函数声明如下

1
class_name ( class_name && );

emplace_back

c++11 容器新增了 emplace_back, emplace等方法向容器中加入新的元素。以 vector 的emplace_back 为例,其函数声明如下

1
2
template< class... Args >
void emplace_back( Args&&... args );

emplcae_back 接收一个右值引用,调用其移动构造函数,将对象移动到容器中,而之前的push_back 是调用一次对象的拷贝构造函数, 容器中存储的是拷贝后的副本。

std::move

std::move 的作用是将左值转为右值引用类型。

示例

示例代码测试了 移动构造函数,emplace_back, push_back, std::move

1
2
3
4
5
6
7
8
9
10
11
12
13
14
15
16
17
18
19
20
21
22
23
24
25
26
27
28
29
30
31
32
33
34
35
36
37
38
39
40
41
42
43
44
45
46
47
48
49
50
51
52
53
54
55
56
57
58
59
60
61
62
63
64
65
66
67
68
69
70
71
72
73
74
75
76
77
78
79
80
81
82
83
84
85
86
/*************************************************************************
> File Name: emplace.cpp
> Author: ce39906
> Mail: ce39906@163.com
> Created Time: 2018-07-26 15:03:11
************************************************************************/
#include <vector>
#include <cstring>
#include <iostream>
class A
{
public:
A (const int size) : size(size)
{
if (size)
{
data = new char[size];
}
std::cout << "I'm constructor.\n";
}

A (const A& other)
{
size = other.size;
data = new char[size];
memcpy(data, other.data, size * sizeof(char));
std::cout << "I'm copy constructor.\n";
}

A (A&& other)
{
size = other.size;
data = other.data;

other.size = 0;
other.data = nullptr;
std::cout << "I'm move constructor.\n";
}

private:
int size;
char* data = nullptr;
};

int main()
{
std::vector<A> vec;
vec.reserve(1024);

A tmp(5);
std::cout << "push_back a left value.\n";
vec.push_back(tmp);

std::cout << "push_back a right value with std::move.\n";
vec.push_back(std::move(tmp));

std::cout << "emplace_back a left value.\n";
vec.emplace_back(tmp);

std::cout << "emplace_back a right value with std::move.\n";
vec.emplace_back(std::move(tmp));

std::cout << "emplace_back in place.\n";
vec.emplace_back(5);

std::cout << "=========================================\n";
std::cout << "test with buildin string move and emplace_back\n";
std::cout << "=========================================\n";

std::vector<std::string> str_vec;
str_vec.reserve(1024);

std::string str = "I'd like to be inserted to a container";

std::cout << "before emplace_back to vec, str is:\n";
std::cout << str << std::endl;
std::cout << "c_str address is " << (void*) str.c_str() << std::endl;

str_vec.emplace_back(std::move(str));

std::cout << "after emplace_back to vec, str is:\n";
std::cout << str << std::endl;
std::cout << "c_str address is " << (void*) str.c_str() << std::endl;
std::cout << "c_str address of the string in container is "
<< (void*) str_vec.front().c_str() << std::endl;
}

编译代码

g++ –std=c++11 emplace.cpp -o emplace

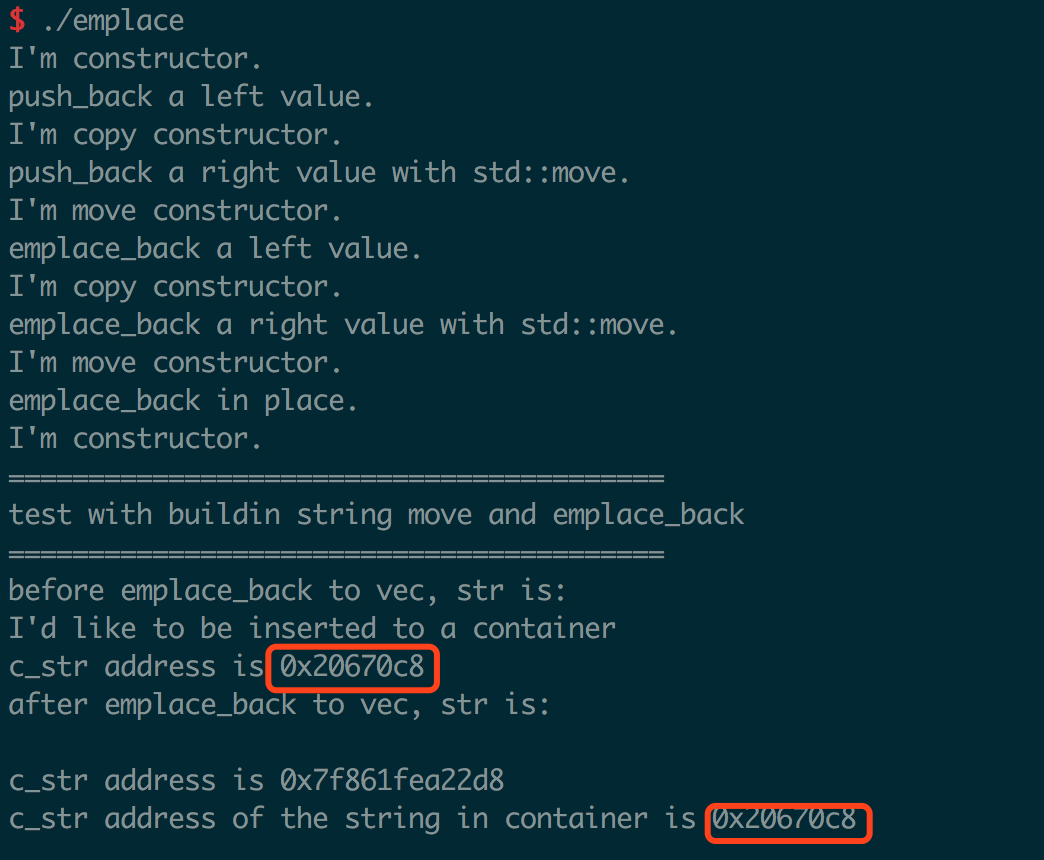
执行,输出结果如下
emplace

从执行结果中,我们可以得出以下结论

  1. push_back 可以接收左值也可以接受右值,接收左值时使用拷贝构造,接收右值时使用移动构造
  2. emplace_back 接收右值时调用类的移动构造
  3. emplace_back 接收左值时,实际上的执行效果是先对传入的参数进行拷贝构造,然后使用拷贝构造后的副本,也就是说,emplace_back在接收一个左值的时候其效果和push_back一致!所以在使用emplace_back 时需要确保传入的参数是一个右值引用,如果不是,请使用std::move()进行转换
  4. emplace_back 接收多个参数时,可以调用匹配的构造函数实现在容器内的原地构造
  5. 使用string 类验证了移动构造函数式对类成员所有权的传递,从上图中看到string 在插入前c_str的地址和使用emplace_back 移动到容器后的c_str的地址一致。并且移动后字符串c_str 的地址指向其他位置。

Trie C++ 实现与解析

发表于 2018-07-20 | 更新于: 2018-09-04 | 分类于 Algorithm

Trie tree 介绍

trie 源自 retrieval ,中文称为前缀树或字典树。具体介绍见wiki trie

C++ 实现

以下trie实现支持任何语言(Chinese,English,Janpanse…)。主要包括以下三个接口

1
2
3
4
5
6
// 使用一组词初始化trie.
void Init(const std::vector<std::string>& dict);
// 在trie 中查找word是否存在.
bool Lookup(const std::string& word);
// 返回在trie中所有以word为前缀的词.
std::vector<std::string> Suggest(const std::string& word);

具体代码实现如下
trie.hpp

1
2
3
4
5
6
7
8
9
10
11
12
13
14
15
16
17
18
19
20
21
22
23
24
25
26
27
28
29
30
31
32
33
34
35
36
37
38
39
40
41
42
43
44
45
46
47
48
49
50
51
52
53
54
55
56
57
58
59
60
61
62
63
64
65
66
/*************************************************************************
> File Name: trie.hpp
> Author: ce39906
> Mail: ce39906@163.com
> Created Time: 2018-07-19 11:12:09
************************************************************************/
#ifndef TRIE_HPP
#define TRIE_HPP

#include <vector>
#include <string>

namespace trie
{

class Trie
{
static constexpr size_t kAsciiCount = 256;
struct TrieNode
{
TrieNode(const char val)
: val(val), is_end(false), childrens(kAsciiCount, nullptr)
{
}

char val;
bool is_end;
std::vector<TrieNode*> childrens;
};

public:
Trie()
{
root = new TrieNode('0');
}

~Trie()
{
ReleaseTrie(root);
}

Trie(const Trie&) = delete;
Trie& operator = (const Trie&) = delete;

void Init(const std::vector<std::string>& dict);

bool Lookup(const std::string& word) const;

std::vector<std::string> Suggest(const std::string& word) const;

void PrintSuggs(const std::string& word) const;

private:

void Insert(const std::string& word);

bool Search(const TrieNode* parent, const std::string& word, const size_t idx) const;

void Dfs(const TrieNode* cur, std::string& word, std::vector<std::string>& suggs) const;

void ReleaseTrie(const TrieNode* root);

TrieNode* root;
};
} // ns trie
#endif
阅读全文 »

[LeetCode] Implement Rand10() Using Rand7()

发表于 2018-07-18 | 更新于: 2018-07-18 | 分类于 Algorithm

题目描述

Given a function rand7 which generates a uniform random integer in the range 1 to 7, write a function rand10 which generates a uniform random integer in the range 1 to 10.

Do NOT use system’s Math.random().

Example 1:

Input: 1
Output: [7]

Example 2:

Input: 2
Output: [8,4]

Example 3:

Input: 3
Output: [8,1,10]

Note:

rand7 is predefined.
Each testcase has one argument: n, the number of times that rand10 is called.

rand7 返回均匀分布的1到7,要求根据rand7 实现一个rand10, 要求返回均匀分布的1到10。
解决思路是先构建一个randN, N 要求是 10 的整数倍。由randN % 10 可以得到rand10。
由rand7 可以得到 rand49 , rand49 通过过滤掉大于等于40 的可以得到 rand40, 进而可以得到rand10。综上,解决思路如下:

rand7 -> rand49 -> rand40 -> rand10

此解决方案可以推广到所有randN 生成randM (N < M) 的场景。

C++ 实现

1
2
3
4
5
6
7
8
9
10
11
12
13
14
15
16
17
18
19
20
21
22
23
24
25
26
27
// The rand7() API is already defined for you.
// int rand7();
// @return a random integer in the range 1 to 7

class Solution {
public:
int rand10() {
const int num = rand40();
return num % 10 + 1;
}
private:
// return 0 ~ 48 randomly
int rand49()
{
return 7 * (rand7() - 1) + rand7() - 1;
}
// return 0 ~ 39 randomly
int rand40()
{
int num = rand49();
while(num >= 40)
{
num = rand49();
}
return num;
}
};

[LeetCode] Reordered Power of 2

发表于 2018-07-17 | 更新于: 2018-07-17 | 分类于 Algorithm

题目描述

Starting with a positive integer N, we reorder the digits in any order (including the original order) such that the leading digit is not zero.

Return true if and only if we can do this in a way such that the resulting number is a power of 2.

Example 1:

Input: 1
Output: true

Example 2:

Input: 10
Output: false

Example 3:

Input: 16
Output: true

Example 4:

Input: 24
Output: false

Example 5:

Input: 46
Output: true

Note:
1 <= N <= 10^9

输入是正整数,要求 求对数字排列后得到的数是否存在一个是2的整数次幂。
解决思路是将N转为string,然后利用stl 提供的next_permutation 获得所有排列,遍历所有情况检查是否存在2的整数次幂。

C++ 实现

1
2
3
4
5
6
7
8
9
10
11
12
13
14
15
16
17
18
19
20
21
22
23
24
25
26
27
class Solution {
public:
bool reorderedPowerOf2(int N) {
string str_num = to_string(N);
// 使用next_permutation 之前应排序
sort(str_num.begin(), str_num.end());
do
{
if (str_num.front() == '0')
{
continue;
}
if (isPowerOf2(stoi(str_num)))
{
return true;
}
} while(next_permutation(str_num.begin(), str_num.end()));

return false;
}
private:
bool isPowerOf2(const int num) const
{
return (num & num - 1) == 0;
}

};

[LeetCode] Split Linked List in Parts

发表于 2018-07-16 | 更新于: 2018-07-16 | 分类于 Algorithm

题目描述

Given a (singly) linked list with head node root, write a function to split the linked list into k consecutive linked list “parts”.

The length of each part should be as equal as possible: no two parts should have a size differing by more than 1. This may lead to some parts being null.

The parts should be in order of occurrence in the input list, and parts occurring earlier should always have a size greater than or equal parts occurring later.

Return a List of ListNode’s representing the linked list parts that are formed.

Examples 1->2->3->4, k = 5 // 5 equal parts [ [1], [2], [3], [4], null ]
Example 1:

Input:
root = [1, 2, 3], k = 5
Output: [[1],[2],[3],[],[]]
Explanation:
The input and each element of the output are ListNodes, not arrays.
For example, the input root has root.val = 1, root.next.val = 2, \root.next.next.val = 3, and root.next.next.next = null.
The first element output[0] has output[0].val = 1, output[0].next = null.
The last element output[4] is null, but it’s string representation as a ListNode is [].

Example 2:

Input:
root = [1, 2, 3, 4, 5, 6, 7, 8, 9, 10], k = 3
Output: [[1, 2, 3, 4], [5, 6, 7], [8, 9, 10]]
Explanation:
The input has been split into consecutive parts with size difference at most 1, and earlier parts are a larger size than the later parts.
Note:

The length of root will be in the range [0, 1000].
Each value of a node in the input will be an integer in the range [0, 999].
k will be an integer in the range [1, 50].
输入是一个链表,要求把链表尽量平分为k 份,如果不能完全平分,要求划分后的每部分最多相差不超过一个且size 更大的部分处于相对前面的位置。
解题思路是遍历一遍求出链表的长度,然后求出每部分的长度以及不能平分的长度。顺序遍历链表,按照分组要求不断截断链表后插入。

C++ 实现

1
2
3
4
5
6
7
8
9
10
11
12
13
14
15
16
17
18
19
20
21
22
23
24
25
26
27
28
29
30
31
32
33
34
35
36
37
38
39
40
/**
* Definition for singly-linked list.
* struct ListNode {
* int val;
* ListNode *next;
* ListNode(int x) : val(x), next(NULL) {}
* };
*/
class Solution {
public:
vector<ListNode*> splitListToParts(ListNode* root, int k) {
int size = 0;
ListNode* x = root;
while(x)
{
size++;
x = x->next;
}

const int part_size = size / k;
const int left = size % k;
// 直接初始化大小为k的数组,这样不需要对part_size为0的情况进行特殊处理
vector<ListNode*> res(k);
for (int i = 0; i < k && root; i++)
{
res[i] = root;
// 前面几个部分需要均摊掉left的部分,每部分消费一个
for (int j = 1; j < part_size + (i < left); j++)
{
root = root->next;
}
ListNode* next = root->next;
// 截断链表
root->next = nullptr;
// 更新游标位置
root = next;
}
return res;
}
};
12…5
carbo06@163.com

carbo06@163.com

About Linux C++ and routing algorithms.

45 日志
5 分类
18 标签
GitHub E-Mail
Friends
  • DingliYang
  • SongZhang
© 2018 carbo06@163.com
0%